Showing posts with label recycle. Show all posts

Tuesday, May 2, 2017

Pendant light shade re-do!

You know the shades they have for the lights that hang down low over your bar or kitchen sink, pendant lights? They have the best shades, very artsy! Thick, nice, clear, or frosted textured and or smooth.
Many colors!
Well, what happens when you break one and you have to replace all the shades because you can not find the ones you have anymore...out of style?
You replace the Pendant lamps with new shades, get a face lift for the kitchen,  and make something out of those shades.
Lol!
I got these from a friend that found a bunch of them. Gave a few to me at clay day, and told me to make something, it was so funny because a couple of days before I had pulled out a Lamp shade from a floor lamp that I absoluetly loved and had broken. I could not through the glass away. I loved it! I was going to and then this hit me. Like a slap upside the head it came to me.
I went to clay day and then more glass lamp shades came my way. bam! There is the idea, ready and waiting in the back of my trap.
There is a saying that if you see something three times look in to it! It is trying to tell you something.
I don't really wait for three anymore! More that once within a week I check it out!

Here is the result of the shades and below is the large one I am doing. About punch bowl size I would say. Perfect for table top, with dried flowers or ornamental fruit in glass.


Monday, August 26, 2013

I am well, I have missed you, and I am coming back on the blog I think ;)

I just wanted to visit and say that I am going to be posting again! I have written a book, been taking care of myself, and tending to my life. My health was not the best (fat and run down) and I have been changing that. I want to be healthy.
Tired of being tired, I wanna grow old like my parents, they live a full life and they are my idols and still dancing and loving life at 76. My mother looks more like my sister now!
My grand daughter is getting big, she is 4 and a wonderful child. I don't see her as much as I used to, but will be starting to watch her time full again this week. Her mother is going after her dream and I am so proud of the changes my "little girl" has made in her life. Going back for her high school equivalency at 30, damn, I am so proud of my girls, such wonderful women, my gifts.
She is now going to continue her education for the next 11 months.


I am going to post things that are more general here, about me, my life, my family and what I do to create.
It has been a long time and I need to get familiar with the program again.
I have missed you!

Here is the first tip of the day.

I save the lids from canned frozen juice, (Oh hell, why lie? I save everything.)
I love their perfect circle-ness. I just knew there were things I could do with them. I love to recycle when ever I can, I think we should, and I have been saving these for a while. They are just hanging out and falling in front of me all of the time. LOL!
I am going to share this once in a while so you can expect that.
Do you save them?
Have you got a good application for them?
Have they never even crossed you mind?
Will they now??
LOL!!

Here is one.
I use them to mix small batches of epoxy

Sunday, December 25, 2011

Merry Christmas to all and to all a goodnight!

May the spirit of Christmas bless you with love, abundance, joy, and peace in your heart!
Wishing you all the very happiest of Holidays with your family and friends.
May your New Year be better than 2011 ever was.
Relax. It is all good.
Santa Can Christmas 2011
Marie Segal


Tuesday, November 15, 2011

Finished onthe 15th, Fave Crafts Blog hop

Today is the Fave Crafts Blog Hop Finished on the 15th. It is about recycled products.
Click on the blog hop button above to go there and see all of the recycled crafts. Or cut and paste below
http://www.favecraftsblog.com/november-blog-hop-recycling-crafts-giveaway/
It is a contest again if you feel like voting.


I have been busy with life and finding less and less time as we are getting towards all of the holidays. There are so many things to do when your granddaughter is almost 3. Santa pictures, play, Christmas crafts, play, play, play, play, and more play. She is in to role playing now and I have been all of her friends, her stuffed animals, TV friends, swiper, and Uniqua (TV characters). It is fun, so I am behind.
Have a wonderful Thanksgiving everyone and may someone like my grand daughter light your life up and show you how to remember how to play and imagine!!


Here is my latest tin can project "Tin Can Taco box".
Just add food.
The instructions to cover the box are from the last Blog hop and here.
http://mariesegal.blogspot.com/2011/10/finished-on-15th-tin-can-pumpkin-box.html 
You could even make a pumpkin with out the face for thanksgiving treats.
Have a great Holiday.

Friday, October 28, 2011

Another tin can box, "Taco" inspired by Ortega 4 ounce green chili cans

The instructions for the tin can box is here.
http://mariesegal.blogspot.com/2011/10/finished-on-15th-tin-can-pumpkin-box.html
All you have to do is add food stuffs.

I had to do it.
The Ortega can.


Everything you would need for a taco dinner.


Onions, tomatoes, and shells.


Olives, avocados, and red peppers.


Beans, Cheese, and green peepers.


Lid off.


The whole thing has a taco shell finish.
Taco feet, ;-D
This has got to be one of my all time favorites and it makes me hungry.


Yummmmmmm!


Friday, October 14, 2011

Tin can pumpkin box part 1- DIY


I thought you would like to see how I make the can boxes.
Never throw another can away again.
LOL!!

You will need:

4 ounce Ortega chili can (You can use any can size but the cutters I am using are for the 4 ounce size can) to find the right circle cutters, put a cutter inside the lid top to see which cutter will work and then use the nest size up for lid top.

Cernit Clay in


Orange
Light Green
Gold
Caramel
Opaque white
Black
Poppy red
Yellow
Large block of Biscuit

1/2" Oval Kemper cutter
3/16" round Kemper cutter
1 1/8" round cutter
2" round cutter
2 1/2" round cutter
2 3/4" round cutter
Clay slicing blade
Knitting needle or bic stic pen

I mix all of my colors equally with the same amount of biscuit.

Condition to one color.

Cut off top of can with a side cutting can opener.


Put a thin layer of the Ultimate glue on the lid and the bottom of the inside of the can bottom and the top.


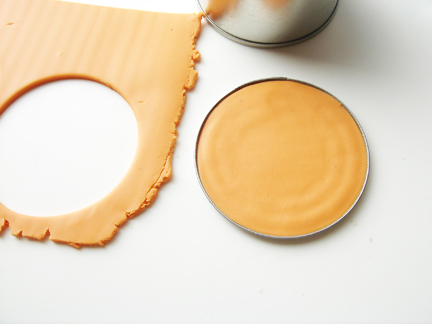
Roll out orange on the thickest setting.
Cut out 2 circles that fit in the top and the bottom of the can and the lid.


Place Orange clay circles in to the bottom and the top and start pressing gently in the center of the circles and working your way out to the edges to press out air bubbles. It will also push clay to the edges if you have a little bit smaller clay circle.


Now use the next cutter size up from the one you used to fill the top and the bottom and cut out one of those.
Place on top of the lid.
Press into the clay already in the lid and fold over the edge just slightly.


Roll out a strip of orange clay on the 3rd thickest setting and cut off the bottom for a straight edge.

Make sure it will wrap around the whole can. I forgot to measure it. ;-D


Place a layer of glue on to the surface of the can with your finger.
Cover the sides and the bottom edge.


Wrap around can and over leading edge to make a slight mark so you know where to cut the strip.

Press out air as you wrap around.


Cut just inside the line close to the can.

Match edges together and smooth with finger or tool.


Hold blade at an angle and trim around the top of the can.


See how blade is angled down and rotate the can and trim.


Even out the edge and press to the top of the can side.


Turn the can over and press the side clay to the bottom of the can clay.


I use a 1/8" metal rod to make indents in the side of the can like the indents in the side of the pumpkin.
I make 3 close together for registrations marks.


Like so. Some of the lines do not have to go from the top to the bottom and can be just marks on the top side or the bottom side.


Using the rod again, place the lid on the can and mark from the side of the lid where a top mark on the can starts to...


The middle of the can.
You can see my three lines for registration already marked on the top of the lid.


All the top side marks continued on the top of the lid to the center of the lid.
Place you blade in to the side of the lid and gently pop off the can.


Take a 1" ball of Opaque white and mix with a 1/2" ball of caramel till one color.


Pinch off enough for a 1" ball and roll till smooth.


Roll into a kind of a bowling pin shape.


Flatten around the top edge on the smallest side of the "bowling pin".


Put a Little dip in there.


Now flatten out the bottom.


Pull out little pinches of the bottom and roll between your fingers to lengthen.
I made five little fingers in the bottom all of varying lengths.


Place in the center of the lid and use the metal rod to mark up the sides of the stem.


I start in the dips between the little fingers and go up the side of the stem.


Stay tuned for part 2...


Tuesday, September 13, 2011

Tin can box

This is something I have been working on lately too.
It is made from a Ortega 4 ounce diced green chili can.

I like how it is hard to find the can.
It is also very busy, I like busy like this.
It has little feet on the bottom and they have angels in front of them.

You can see how big it is when I hold it in my hand.
Perfect for special treasures.

I am liking this very much. It was fun to make. It is using recycled materials. I think it is beautiful.

You can see the can now!
Have a great Tuesday.
Create a new way today.