Showing posts with label tin can box. Show all posts

Friday, October 28, 2011

Another tin can box, "Taco" inspired by Ortega 4 ounce green chili cans

The instructions for the tin can box is here.
http://mariesegal.blogspot.com/2011/10/finished-on-15th-tin-can-pumpkin-box.html
All you have to do is add food stuffs.

I had to do it.
The Ortega can.


Everything you would need for a taco dinner.


Onions, tomatoes, and shells.


Olives, avocados, and red peppers.


Beans, Cheese, and green peepers.


Lid off.


The whole thing has a taco shell finish.
Taco feet, ;-D
This has got to be one of my all time favorites and it makes me hungry.


Yummmmmmm!


Saturday, October 15, 2011

Finished on the 15th Tin can pumpkin box part 2- DIY

Thank you so much everyone who has voted, for me or otherwise, you are so appreciated!!

This is my post for the Fave Crafts Blog hop, Finished on the 15th.
http://www.favecraftsblog.com/october-blog-hop-halloween-crafts-anniversary-giveaway/
It is a themed Blog hop for Halloween and I have the chance to win 50$ worth of craft products if you vote for me. Could you please check it out. I would love to win. You have to go to the fave craft  page (click on link of above) and like my post there.
Look for this picture.
You can click on this pumpkin to to go there.
Thank you so much if you do.

I did not get much done because I was getting ready for the San Diego polymer clay Guild's annual Sandy Camp. You can see the witches here
http://mariesegal.blogspot.com/2011/10/1st-day-of-sandy-camp.html
A good time was had by all.


This is continued from part one here
http://mariesegal.blogspot.com/2011/10/tin-can-pumpkin-box-part-1-diy.html


I thought you would like to see how I make the can boxes.
Never throw another can away again.
LOL!!

You will need:

4 ounce Ortega chili can (You can use any can size but the cutters I am using are for the 4 ounce size can) to find the right circle cutters, put a cutter inside the lid top to see which cutter will work and then use the nest size up for lid top.

Cernit Clay in


Orange
Light Green
Gold
Caramel
Opaque white
Black
Poppy red
Yellow
Large block of Biscuit

1/2" Oval Kemper cutter
3/16" round Kemper cutter
1 1/8" round cutter
2" round cutter
2 1/2" round cutter
2 3/4" round cutter
Clay slicing blade
Knitting needle or bic stic pen

I mix all of my colors equally with the same amount of biscuit.

Condition to one color.


Condition some of the light green Cernit and roll out on the thickest setting in your clay machine.
The mix some of the gold Cernit with the light Green 1:1 and roll it out on the thickest setting.
I used a maple leaf cutter and cut out one leaf in each color.


Cut out the stem of the leaf.


Please disregard the piece of clay on the blade ;-D

Cut a "V" at the base of the leaf.


With a knitting needle make marks in the leaves you cut out for veins.


Like so.


From the back of the leaf pinch down the center vein just a little.


Place on the lid of the can. I make the leaves were the "V" is cut go up the stem a little and scrunch up the leaves to make them look real.


Take a 1/2" ball of the light green Cernit and roll out in to an elongated cone about 3" long.


Place the thick end in the dip of the stem and curl up.


Like so.


Roll out some black Cernit on the thickest setting in the clay machine and fold a part of it in half.


Using the 1/2" oval cutter, cut out 3 ovals.


 Stack together. You can wrap these with another piece of very thin black clay if you wish, but I leave them like this.


I roll them gently on the work surface to tack together.


Make 4 sets of these black stacked ovals and place at four corner on the bottom of the can.


Turn the can over and place on the feet and press gently to flatten feet a little.


Cut out 4 more double thick ovals for bat bodies.


Cut out 4 single thickness rounds with the 1 1/4" cutter.


Cut those single thick circles in half.


 Using the point of the 1/2" heart cutter starting on the out side of the half circles cut 3 points across the cut halves of each set.


 Like this. Do that with all of the sets. They will look like wings now.


Using the 1 1/4" cutter mark partial arcs from the points  to the top of the wing.


Like this.


Place a set of wings over each foot like so.


 Roll the little body balls of clay in to stubby pear shapes. Place the smaller end up and place the body over the wing tips and the feet


 Roll out some of the red Cernit on the 6th thickest setting and with the 3/16" round cutter cut out 4 sets of two each for the eyes on the bat.


Cut out a single thickness of black Cernit with the 3/16" cutter and roll into a short little coil and place over the red eyes. Mark in the center with your knitting needle. Do this on each bat.


Roll another little coil of black and cut off tiny slices and roll into a balls for the pupils in the eyes and place like above.


Make a mark for a mouth by moving the knitting needle. Do this on each bat.


Bats done, now for the face of the pumpkin.


Cut a 1/2" strip of single thickness black.


Cut the strip so you have 3 triangles for the eyes and nose.


Place the eyes and nose on your pumpkin.
Press gently on.


Using the 2" cutter, cut out a round and then cut a thin moon shape.


Using the square 1/2" cutter cut out a tooth on the bottom.


Like this.


Roll out some more of the red on the 6th thickest setting and cut out 3/16" rounds and place on the triangles for the eyes.

Sometimes you can place the cutter with the red clay on the triangle and pull back quickly and the clay with stay on the triangle.


Roll out a tiny coil of yellow and cut little sections for pupils and place on the cut out rounds of red.


Like this.


Bake like this on a piece of cardboard shipping box in a pre-heated 275 degree oven for 1/2 hour, shut off oven and let cool.
When the piece is cool you can antique it with brown Ne-Opaque. Brush on the color over the whole piece and wipe off with a damp not wet old piece of towel. It will look like the picture at the top.
Tah-dah!
Happy Halloween.
Thank you for dropping by!


Friday, October 14, 2011

Tin can pumpkin box part 1- DIY


I thought you would like to see how I make the can boxes.
Never throw another can away again.
LOL!!

You will need:

4 ounce Ortega chili can (You can use any can size but the cutters I am using are for the 4 ounce size can) to find the right circle cutters, put a cutter inside the lid top to see which cutter will work and then use the nest size up for lid top.

Cernit Clay in


Orange
Light Green
Gold
Caramel
Opaque white
Black
Poppy red
Yellow
Large block of Biscuit

1/2" Oval Kemper cutter
3/16" round Kemper cutter
1 1/8" round cutter
2" round cutter
2 1/2" round cutter
2 3/4" round cutter
Clay slicing blade
Knitting needle or bic stic pen

I mix all of my colors equally with the same amount of biscuit.

Condition to one color.

Cut off top of can with a side cutting can opener.


Put a thin layer of the Ultimate glue on the lid and the bottom of the inside of the can bottom and the top.


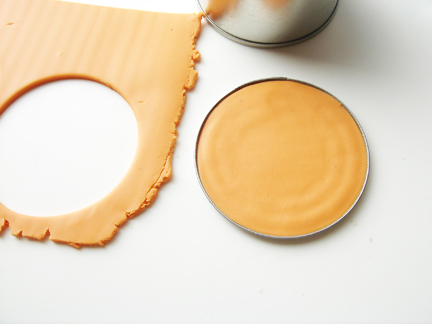
Roll out orange on the thickest setting.
Cut out 2 circles that fit in the top and the bottom of the can and the lid.


Place Orange clay circles in to the bottom and the top and start pressing gently in the center of the circles and working your way out to the edges to press out air bubbles. It will also push clay to the edges if you have a little bit smaller clay circle.


Now use the next cutter size up from the one you used to fill the top and the bottom and cut out one of those.
Place on top of the lid.
Press into the clay already in the lid and fold over the edge just slightly.


Roll out a strip of orange clay on the 3rd thickest setting and cut off the bottom for a straight edge.

Make sure it will wrap around the whole can. I forgot to measure it. ;-D


Place a layer of glue on to the surface of the can with your finger.
Cover the sides and the bottom edge.


Wrap around can and over leading edge to make a slight mark so you know where to cut the strip.

Press out air as you wrap around.


Cut just inside the line close to the can.

Match edges together and smooth with finger or tool.


Hold blade at an angle and trim around the top of the can.


See how blade is angled down and rotate the can and trim.


Even out the edge and press to the top of the can side.


Turn the can over and press the side clay to the bottom of the can clay.


I use a 1/8" metal rod to make indents in the side of the can like the indents in the side of the pumpkin.
I make 3 close together for registrations marks.


Like so. Some of the lines do not have to go from the top to the bottom and can be just marks on the top side or the bottom side.


Using the rod again, place the lid on the can and mark from the side of the lid where a top mark on the can starts to...


The middle of the can.
You can see my three lines for registration already marked on the top of the lid.


All the top side marks continued on the top of the lid to the center of the lid.
Place you blade in to the side of the lid and gently pop off the can.


Take a 1" ball of Opaque white and mix with a 1/2" ball of caramel till one color.


Pinch off enough for a 1" ball and roll till smooth.


Roll into a kind of a bowling pin shape.


Flatten around the top edge on the smallest side of the "bowling pin".


Put a Little dip in there.


Now flatten out the bottom.


Pull out little pinches of the bottom and roll between your fingers to lengthen.
I made five little fingers in the bottom all of varying lengths.


Place in the center of the lid and use the metal rod to mark up the sides of the stem.


I start in the dips between the little fingers and go up the side of the stem.


Stay tuned for part 2...