Sunday, August 14, 2011

Black and White Canes #2 Atomic age influence part 3, Giveaway, and updates

Happy Saturday Sunday. I would have got this up on saturday, but I spent most of the day on the couch being a whiny waawaa. I got the cold. So I didn't get to go hang out with my friend Jodi and have so much fun making crazy stuff and staying up all hours of the night :-( So much for leaving town.

Since Madi has been on the planet I have gotten more colds than I have had in my entire life time.
It is a good thing I really like her ;-D

I am having a giveaway on Mary's Graces blog or I am the one giving the blog giveaway item this week. I am a member of the Mary's Graces Team on Etsy and it is a wonderful group of artists I am so proud to be a part of. Do not comment here, comment over there. Come join us!

And now on with the show...


You can find these Atomic age beauties on Etsy.
Set of 8, now that is really amazing. And the price... even more amazing.
Maplewood Bungalow on Etsy, great vintage finds


Continued from Part 1:
http://mariesegal.blogspot.com/2011/08/black-and-white-canes-2-atomic-age.html

and Part 2:
http://mariesegal.blogspot.com/2011/08/black-and-white-canes-2-atomic-age_09.html

You will need:
2 blocks of Opaque White Cernit
1 block of Black Cernit
Porcelain White Cernit big block
Clay machine
Clay Slicing blade
ruler

Links lead to my husband's store http://www.clayfactory.net/.
Thank you for looking or buying, we appreciate it very much. It helps us eat and pay the bills.


Mix the small blocks of Opaque white with equal amounts of the porcelain white.
Then mix the black block with an equal amount of the porcelain white. It will look slightly lighter, but bakes up a beautiful black color.
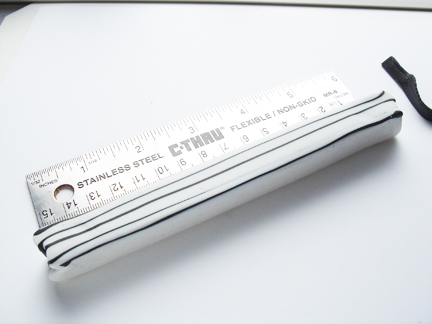


1. This is your 6 1/2". ;-D


2. Sliver off some of the clay from the lines if they have white over them from reducing the cane. Do not take off a lot.
Make sure lines are showing on this side of the cane.


3. Cut cane in half.


4. Here is what it should look like.
Anything close to this, you have done a good job, pat your self on the back. Pretend I did it.


5. Place on the sheet of black clay rolled out on the 5th thickest setting. Fan lines down.


6. (really about step 40 something) Trim away the black so you have a sheet of black the same size and your cane block.


7. There you go, now place the sheet on top of the other half of cane you have mirroring the top cane with the cut edges on the same end.


8. Press together gently. You could if you wished reduce this cane down here and make an awesome border out of this, can you see it?


9. Roll out a coil of white that is over 2 1/2" long and about 1/2" in diameter.


10. Place the white coil on the black sheet that is rolled out on the 5th thickest setting.
Trim the sheet so it is the same width as the coil is long.


11. Roll up in black sheet.
Roll over the edge of the beginning of the sheet over the other side of the sheet to make a mark. Roll back away from the mark.


12. Here you can see the mark I made with the edge of the clay.


13. Place the edge of the blade on the inside of the line mark you made or closest to the cane.
Tilt the blade towards the cane. Cut at this angle.


14. Roll up and press the edges together.
Smooth gently.


15. Roll the coil down and extend the length.
Roll down to about 1/4" in diameter.


16. It will look like this.


17. Cut 4 pieces the length of your cane block.


Continued in part 4...

Wednesday, August 10, 2011

Wednesday Wonder- next time

It is official- teething sucks.
Madi is now sick with a cold from lowered resistance from teething. At least that is what her doctor says.
She also bit her tongue really bad.
It is even suckier that I can not really do anything for her.
I get it. This is why they say two-year olds are so rotten.

She says she wants something to drink and I bring it to her and she tells me no! No she screams at me.
I have no time to leisurely browse the Internet to look for non traditional medium for Wednesday wonders.
I did make this last week though and it is now listed in my shop.

I love these hearts of stone. This is probably one of my most favorites and it is now listed in my Etsy store.
http://www.etsy.com/listing/79407297/hearts-of-stone-pendant-4-rock-steady?ref=sc_1
If you go look, thank you so much!!


I also made these. This is Frida and her friend. They are focal beads.
They are larger.


I love them.
They are also listed in my store.
http://www.etsy.com/listing/79272110/frida-and-her-friend-skull-beads-1-set
I may have to make more of these, depends on the response though.

I still find time to make things and work, even if I have to stay up till midnight.
I take naps when Madi does. Shhhh, don't tell anyone.
I am so lucky to be able to be with my grand-daughter and I am so lucky to be able to feed my creative soul.

But this week and last... I am wondering if a real job might be a better choice. ;-D
The weekend is almost here. I may have to leave town.
Have a great hump day you all.

Tuesday, August 9, 2011

Black and White Canes #2 Atomic age influence part 2

Just a note:
All of the sudden my Blog is working wonderfully, I hope your is too!! In IE8. Wooooooooooo Whoooooooo!!! Thank you Blogger!

This design is from a web site called Lamp in a Box
Here is where this design is
Great Idea!


Continued from Part 1:
http://mariesegal.blogspot.com/2011/08/black-and-white-canes-2-atomic-age.html
You will need:
2 blocks of Opaque White Cernit
1 block of Black Cernit
Porcelain White Cernit big block
Clay machine
Clay Slicing blade
ruler

Links lead to my husband's store http://www.clayfactory.net/.
Thank you for looking or buying, we appreciate it very much. It helps us eat and pay the bills.


Mix the small blocks of Opaque white with equal amounts of the porcelain white.
Then mix the black block with an equal amount of the porcelain white. It will look slightly lighter, but bakes up a beautiful black color.


1. Stand the cane on the end so you are looking at the 1"square end. Roll out some of the black clay on the 5th thickest setting in your clay machine.
Cut down through the cane right in the middle.


2. Leave the one half standing where it is and take the other half and place it on your black sheet of clay. Remember the orientation of this one because you are going to put it back exactly the way it was.  

3. Trim away the black so you have a sheet of black on the white half.


4. Put the one half back with the other and lightly press them together. No smooshing here. Lightly tacking is good!

5. Next cut you make is going to fan out slightly on the left, maybe a quarter-inch, maybe less.

6. Take away the cut section and place it on the back sheet and trim away so you have a black sheet on this section.

7. Place that section back with the block. Tack together again.

8. Now make the same size cut on the right of the black. If you stand up when making cuts and look down over the top of your block as you cat you can make sure the blade is going straight up and down.


9. Place it on the black and trim a sheet to go on the white and place it back together and tack it together.

10. Make another cut on the left side.

11. Black sheet again and put it back and tack.

12. Cut on the right side.

13. Trim the black sheet to match and put back together with black and tack together.

14. Press gently on one side of the block with the flat part of your palm.

15. Rotate the block one-quarter and press gently on the side with the flat of your palm.
You are press on the sides not the ends with the image you made on them.

16. Rotate the block one-quarter and press gently on the side with the flat of your palm.

17. Rotate the block one-quarter and press gently on the side with the flat of your palm.

18. And then back to the beginning. Now flip the cane from end to end and do the pressing steps all over again.
This is slow and even. Flipping the cane block from end to end when you do all four sides.
The cane block will start to get smaller and longer in length.
Once it starts to get about and few inches long you can hold one end and slide you fingers over the side to lengthen. Do all four sides and then flip from end to end again.
You want to do this until the cane block is about 6 and a half or seven inches long.

Monday, August 8, 2011

Happy Monday 8/8/11

Happy Monday to you all.
I hope you all had a wonderful weekend.
I know I left you hanging on that last post.
I am sorry.
My daughters busy time of the year at work is right now and I do not have as much time alone as I usually do. I am watching a 2 year old more hours a day and she has so much energy.
That is not the problem, I love that she is happy and smart.
2 year old molars though, are no fun at all.
Then she didn't feel well all weekend so she stayed with me again.
I sit in my chair at night and try to write and I find my face starting to hit the desk, there is really only so much I can do.
Then Blogger has been acting really strange also. I am not ready to switch to Chrome and I know you say it is fast but what about all of my readers that are still using IE8?
So readers if you are visiting blogs and you are having a hard time loading the blog up, it is because they have switched to Chrome and can do all of this great stuff but you the reader have to wait forever to comment or to load the next thing you want to read. I know, I move on too.
I love Blogger, I started here, but I do not appreciate google forcing me to switch everything over.
My readership is still 49% IE users but I see that it is slowly declining. Then I see that google Chrome is steadily rising in the market share. Remember the movie Demolition man with Sylvester Stallone, Sandra Bullock, and Wesley Snipes and all the restaurants are Taco Bell? Remember all of the people are enamored of the marketing of huge giants of companies? It is funny there, but it is really not funny here. I feel like all the Internet is Google. I like to mix it up a little.
Well anyway, rant, sorry!
These are all excuses.
I will get on that part 2 right away!!
So Happy Monday, may your week be filled with wonderful people.
May you have many happy moments.
May you have love all the time.
and may you be abundant beyond your dreams.
Remember too that there are many many different forms of abundance besides money!
See if you can find a few this week.

Wednesday, August 3, 2011

Black and White Canes #2 Atomic age influence part1

This qualifies for a Wednesday wonder because it is a wonder I got this posted.
Oy! What a week. Yes, I know it is only Wednesday!
;-D
Onward and up ward.

Blog angel please do your stuff!


I got this wonderful picture from Looms Showroom
The link for the fabric is here.

First black and white cane, part 1
http://mariesegal.blogspot.com/2011/07/black-and-white-canes-atomic-age.html
Part 2
http://mariesegal.blogspot.com/2011/07/black-and-white-canes-atomic-age_14.html
part 3
http://mariesegal.blogspot.com/2011/07/fave-crafts-blog-hop-black-and-white.html


You will need:
2 blocks of Opaque White Cernit
1 block of Black Cernit
Porcelain White Cernit big block
Clay machine
Clay Slicing blade
ruler

Links lead to my husband's store http://www.clayfactory.net/.
Thank you for looking or buying, we appreciate it very much. It helps us eat and pay the bills.


Mix the small blocks of Opaque white with equal amounts of the porcelain white.
Then mix the black block with an equal amount of the porcelain white. It will look slightly lighter, but bakes up a beautiful black color.
1. Condition and roll out the mixed white on the thickest setting. You will need both blocks to make the large sheet. This sheet is about 12" long and 5" wide.


2.  Fold the whole sheet in half to double the thickness.


3. Press out the air and attach the two thicknesses together starting at the fold.


 4. Cut the double thick sheet in half.


5. Turn one sheet around and place on top of the other so all cut edges are on the same side.


6. Like so.


7. Cut this stacked sheet in half.


8. Flip the right side over on top of the left side so all the cut edges are on the same side.


9. It will look like this.


10. Cut that stack in half.


11. Flip those sections back to back.


12. Now trim off all the rough edges to make a rectangle block.


13. Turn the black what ever way you need to, to trim it.
You will notice some ways will be easier to cut than others. Go with easy. ;-D


14. Take off enough just to make it straight.


15. Compact on all sides with your palm. I am pressing firmly but not enough to take it out of shape.


16. trim off what ever else you need to make the sides as straight as possible.


17. It will be 1 1/2" long x 1" x 1"


I will continue in part 2...

Monday, August 1, 2011

Monday Updates- I am so excited, I have my blog back

Happy August! The year is flying by, yes?
I am back, even the back feels a little better.

Well, I kept waiting for it to get fixed but it wasn't happening and I was tired of waiting so...
I took out IE9 and went back to IE8.
I can edit my blog and I am happy, but I deleted the blog I was working on. ;-(
So I am starting over. ;-D
It was in moment of frustration that I deleted them yesterday.
When my back is out, I am not the most patient person in the world. Ask Madi.
Making 40 different things to eat doesn't work on those days. ;-D


I have added this blog angel to my header to protect my blog and to remind me to not upload beta. ;-D