It is time again for the Fave Crafts Blog hop- finished on the 15th.
You can click on the link/logo to take to you to a Fave Crafts page with all of the other artists participating in this.
Welcome to my site.
I am in the midst of a tutorial on Black and White canes with Cernit polymer clay.
A cane is a method of making images in rods of clay by layering different colors of clay together to form that image.
Then cross sections are cut of those rods and used in many applications like jewelry, and application to many different things like light switch plates, silver ware, glass, and ceramics just to name a few. The possibilities are endless.
It is an adapted technique from ceramic and glass, in ceramics it is called neriagi and in glass it is called millefiori.
You can see a wonderful example of neriagi here by Ito Sekisui V, make sure you scroll down to see the flowered vessel:
http://www.e-yakimono.net/html/ito-sekisui-v.html
Here is Wiki's definition with pictures of Millefiori in glass:
http://en.wikipedia.org/wiki/Millefiori
And now for the tutorial...
Continued from Part 1: http://mariesegal.blogspot.com/2011/08/black-and-white-canes-2-atomic-age.html
and Part 2:
http://mariesegal.blogspot.com/2011/08/black-and-white-canes-2-atomic-age_09.html
and Part 3:
http://mariesegal.blogspot.com/2011/08/black-and-white-canes-2-atomic-age_14.html
You will need:
2 blocks of Opaque White Cernit
1 block of Black Cernit
Porcelain White Cernit big block
Clay machine
Clay Slicing blade
ruler
Links lead to my husband's store http://www.clayfactory.net/.
Thank you for looking or buying, we appreciate it very much. It helps us eat and pay the bills.
Mix the small blocks of Opaque white with equal amounts of the porcelain white.
Then mix the black block with an equal amount of the porcelain white. It will look slightly lighter, but bakes up a beautiful black color.
1. Trim off the ends of your cane (so far).
2. Stand the cane on one end.
3. Add the round cane rods that you cut in part 3 to the block you have standing on end.
They go at the four points of the diamond image.
Trim off the excess from the four round rods.
4. Like so.
5. Roll a small coil of white clay about 3/16" and using your thumb and forefinger press in to a triangle shape.
6. You will need 8 of these as long as your image block is high to go around the small rods in white wrapped in black.
7. Tuck one of the points of the triangle in to the space under the coil, just enough to fill that space, not enough to move it.
8. Press them in like this. I have this turned on its side so I can show you how it is done. You do not want to lay this on the round cane and press it in, it has to be standing so you do not flatten the round rods.
9. Fill all of those spaces on the image block.
10. Roll a coil of white clay that is about 3/4" in diameter and a little bit longer than the length of the image block. Trim off one end so it has a flat edge.
11. Cut the coil in half through the length.
12. Add one half flat side in, to the top right side of the image and add the other one to the bottom left hand side of the image flat side against the image.
13. Roll another coil that is the length of the image block's height.
14. Now cut that one in half through the length. Add those to the other diagonal spaces. The top left and the right bottom of the image block.
15. Roll out a coil of white that is about 3/8" in diameter. Press it into a triangle shape.
16. Add those triangles to the left and right side of the image right in the middle of the two half coil on each side.
17. Roll out another small coil of white about 3/16" and press into a triangle.
This you will use to fill in the two spaces on the top and the bottom of the image block where there is a dip on the top and one the bottom.
You will need four of these triangle pieces.
18. Here the image block is filled in all the spaces with one left to trim off. It is basically in a rectangle shape.
19. Pinch the block in the top corners and in the bottom corners to make them more defined and more like a rectangle. Pinch them all the way down the image block side in all 4 corners.
20. Roll out a sheet of white on the thickest setting in the clay machine. Trim off the leading edge for the straight edge. Lay the rectangle image block on that edge.
Trim off the right and the left side of the block to make the sheet that width.
Wrap the sheet around the rectangle image black sides.
21. Wrap it up and trim the other end of the sheet to match the beginning of the sheet. Smooth the seam with your finger.
22. Press on the side of the image block to compress together and reduce. Go slow and use the flat part of your palm (or the flattest part) usually the heel of your palm. That heel of your palm is the strongest too. Press down as evenly as you can.
Turn the block 1/4 turn to another side and press again the same way.
You have now done all four sides.
Flip the cane(image block) from end to end and proceed to do all 4 sides again. then repeat, doing this over and over until you have reduced the cane down to about half the size.
23. When I have reduced the cane down far enough I then I hold the cane with one hand and use my upper palm and slide my hand down the cane to lengthen it.
Always turning it one-quarter turn now and again and then I flip it from end to end and do the same thing from the other side of the cane. This makes it smooth and stretches it out. I am gliding the top of my palm over the clay.
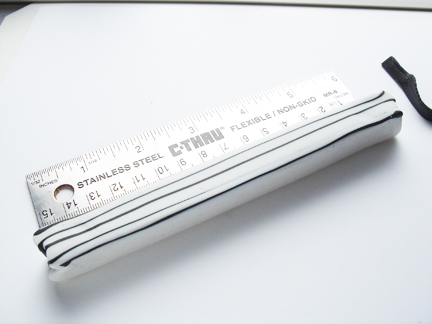
24. When you have reduced it down to about 1" by 3/4" cut it in half.
Tah dah!
Come back for the next one we are going to cover a votive in all the black and white canes we have made so far.
Showing posts with label atomic age. Show all posts
Sunday, August 14, 2011
Fave Crafts Blog Hop- Black and White Canes #2 Atomic age influence part 4, and Happy Monday!!
Black and White Canes #2 Atomic age influence part 3, Giveaway, and updates
Happy Saturday Sunday. I would have got this up on saturday, but I spent most of the day on the couch being a whiny waawaa. I got the cold. So I didn't get to go hang out with my friend Jodi and have so much fun making crazy stuff and staying up all hours of the night :-( So much for leaving town.
Since Madi has been on the planet I have gotten more colds than I have had in my entire life time.
It is a good thing I really like her ;-D
Continued from Part 1:
http://mariesegal.blogspot.com/2011/08/black-and-white-canes-2-atomic-age.html
and Part 2:
http://mariesegal.blogspot.com/2011/08/black-and-white-canes-2-atomic-age_09.html
You will need:
2 blocks of Opaque White Cernit
1 block of Black Cernit
Porcelain White Cernit big block
Clay machine
Clay Slicing blade
ruler
Links lead to my husband's store http://www.clayfactory.net/.
Thank you for looking or buying, we appreciate it very much. It helps us eat and pay the bills.
Mix the small blocks of Opaque white with equal amounts of the porcelain white.
Then mix the black block with an equal amount of the porcelain white. It will look slightly lighter, but bakes up a beautiful black color.
1. This is your 6 1/2". ;-D
2. Sliver off some of the clay from the lines if they have white over them from reducing the cane. Do not take off a lot.
Make sure lines are showing on this side of the cane.
3. Cut cane in half.
4. Here is what it should look like.
Anything close to this, you have done a good job, pat your self on the back. Pretend I did it.
5. Place on the sheet of black clay rolled out on the 5th thickest setting. Fan lines down.
6. (really about step 40 something) Trim away the black so you have a sheet of black the same size and your cane block.
7. There you go, now place the sheet on top of the other half of cane you have mirroring the top cane with the cut edges on the same end.
8. Press together gently. You could if you wished reduce this cane down here and make an awesome border out of this, can you see it?
9. Roll out a coil of white that is over 2 1/2" long and about 1/2" in diameter.
10. Place the white coil on the black sheet that is rolled out on the 5th thickest setting.
Trim the sheet so it is the same width as the coil is long.
11. Roll up in black sheet.
Roll over the edge of the beginning of the sheet over the other side of the sheet to make a mark. Roll back away from the mark.
12. Here you can see the mark I made with the edge of the clay.
13. Place the edge of the blade on the inside of the line mark you made or closest to the cane.
Tilt the blade towards the cane. Cut at this angle.
14. Roll up and press the edges together.
Smooth gently.
15. Roll the coil down and extend the length.
Roll down to about 1/4" in diameter.
16. It will look like this.
17. Cut 4 pieces the length of your cane block.
Since Madi has been on the planet I have gotten more colds than I have had in my entire life time.
It is a good thing I really like her ;-D
I am having a giveaway on Mary's Graces blog or I am the one giving the blog giveaway item this week. I am a member of the Mary's Graces Team on Etsy and it is a wonderful group of artists I am so proud to be a part of. Do not comment here, comment over there. Come join us!
And now on with the show...
You can find these Atomic age beauties on Etsy.
Set of 8, now that is really amazing. And the price... even more amazing.
Maplewood Bungalow on Etsy, great vintage finds
Continued from Part 1:
and Part 2:
http://mariesegal.blogspot.com/2011/08/black-and-white-canes-2-atomic-age_09.html
You will need:
2 blocks of Opaque White Cernit
1 block of Black Cernit
Porcelain White Cernit big block
Clay machine
Clay Slicing blade
ruler
Links lead to my husband's store http://www.clayfactory.net/.
Thank you for looking or buying, we appreciate it very much. It helps us eat and pay the bills.
Mix the small blocks of Opaque white with equal amounts of the porcelain white.
Then mix the black block with an equal amount of the porcelain white. It will look slightly lighter, but bakes up a beautiful black color.
1. This is your 6 1/2". ;-D
2. Sliver off some of the clay from the lines if they have white over them from reducing the cane. Do not take off a lot.
Make sure lines are showing on this side of the cane.
3. Cut cane in half.
4. Here is what it should look like.
Anything close to this, you have done a good job, pat your self on the back. Pretend I did it.
5. Place on the sheet of black clay rolled out on the 5th thickest setting. Fan lines down.
6. (really about step 40 something) Trim away the black so you have a sheet of black the same size and your cane block.
7. There you go, now place the sheet on top of the other half of cane you have mirroring the top cane with the cut edges on the same end.
8. Press together gently. You could if you wished reduce this cane down here and make an awesome border out of this, can you see it?
9. Roll out a coil of white that is over 2 1/2" long and about 1/2" in diameter.
10. Place the white coil on the black sheet that is rolled out on the 5th thickest setting.
Trim the sheet so it is the same width as the coil is long.
11. Roll up in black sheet.
Roll over the edge of the beginning of the sheet over the other side of the sheet to make a mark. Roll back away from the mark.
12. Here you can see the mark I made with the edge of the clay.
13. Place the edge of the blade on the inside of the line mark you made or closest to the cane.
Tilt the blade towards the cane. Cut at this angle.
14. Roll up and press the edges together.
Smooth gently.
15. Roll the coil down and extend the length.
Roll down to about 1/4" in diameter.
16. It will look like this.
17. Cut 4 pieces the length of your cane block.
Continued in part 4...
Tuesday, August 9, 2011
Black and White Canes #2 Atomic age influence part 2
Just a note:
All of the sudden my Blog is working wonderfully, I hope your is too!! In IE8. Wooooooooooo Whoooooooo!!! Thank you Blogger!
Continued from Part 1:
http://mariesegal.blogspot.com/2011/08/black-and-white-canes-2-atomic-age.html
You will need:
2 blocks of Opaque White Cernit
1 block of Black Cernit
Porcelain White Cernit big block
Clay machine
Clay Slicing blade
ruler
Links lead to my husband's store http://www.clayfactory.net/.
Thank you for looking or buying, we appreciate it very much. It helps us eat and pay the bills.
Mix the small blocks of Opaque white with equal amounts of the porcelain white.
Then mix the black block with an equal amount of the porcelain white. It will look slightly lighter, but bakes up a beautiful black color.
All of the sudden my Blog is working wonderfully, I hope your is too!! In IE8. Wooooooooooo Whoooooooo!!! Thank you Blogger!
This design is from a web site called Lamp in a Box
Here is where this design is
Great Idea!
http://mariesegal.blogspot.com/2011/08/black-and-white-canes-2-atomic-age.html
You will need:
2 blocks of Opaque White Cernit
1 block of Black Cernit
Porcelain White Cernit big block
Clay machine
Clay Slicing blade
ruler
Links lead to my husband's store http://www.clayfactory.net/.
Thank you for looking or buying, we appreciate it very much. It helps us eat and pay the bills.
Mix the small blocks of Opaque white with equal amounts of the porcelain white.
Then mix the black block with an equal amount of the porcelain white. It will look slightly lighter, but bakes up a beautiful black color.
1. Stand the cane on the end so you are looking at the 1"square end. Roll out some of the black clay on the 5th thickest setting in your clay machine.
Cut down through the cane right in the middle.
2. Leave the one half standing where it is and take the other half and place it on your black sheet of clay. Remember the orientation of this one because you are going to put it back exactly the way it was.
3. Trim away the black so you have a sheet of black on the white half.
4. Put the one half back with the other and lightly press them together. No smooshing here. Lightly tacking is good!
5. Next cut you make is going to fan out slightly on the left, maybe a quarter-inch, maybe less.
6. Take away the cut section and place it on the back sheet and trim away so you have a black sheet on this section.
7. Place that section back with the block. Tack together again.
8. Now make the same size cut on the right of the black. If you stand up when making cuts and look down over the top of your block as you cat you can make sure the blade is going straight up and down.
9. Place it on the black and trim a sheet to go on the white and place it back together and tack it together.
10. Make another cut on the left side.
11. Black sheet again and put it back and tack.
12. Cut on the right side.
13. Trim the black sheet to match and put back together with black and tack together.
14. Press gently on one side of the block with the flat part of your palm.
15. Rotate the block one-quarter and press gently on the side with the flat of your palm.
You are press on the sides not the ends with the image you made on them.
16. Rotate the block one-quarter and press gently on the side with the flat of your palm.
17. Rotate the block one-quarter and press gently on the side with the flat of your palm.
18. And then back to the beginning. Now flip the cane from end to end and do the pressing steps all over again.
This is slow and even. Flipping the cane block from end to end when you do all four sides.
The cane block will start to get smaller and longer in length.
Once it starts to get about and few inches long you can hold one end and slide you fingers over the side to lengthen. Do all four sides and then flip from end to end again.
You want to do this until the cane block is about 6 and a half or seven inches long.
Continued in part 3...
https://mariesegal.blogspot.com/2011/08/black-and-white-canes-2-atomic-age_14.html
Subscribe to:
Posts (Atom)