While you are reading this I am escaping from home to go hang out with my friend Jodi and talk to an adult, craft until my fingers hurt, and stay up crazy hours. I am expecting to have a good time.
We are going to make some books ;-D
It is hot here, kind of cloudy and humid, I do not feel like doing anything. It is 99 degrees here and almost 4 pm on friday the 26th, crazy!
I will talk to you all on Monday have a great weekend.
Be safe and be well.
Make the canes from the Black and white tutorials.
Continued from Part 1:
http://mariesegal.blogspot.com/2011/08/black-and-white-canes-2-atomic-age.html
and Part 2:
http://mariesegal.blogspot.com/2011/08/black-and-white-canes-2-atomic-age_09.html
and Part 3:
http://mariesegal.blogspot.com/2011/08/black-and-white-canes-2-atomic-age_14.html
Save any pieces from the making of the canes that you have left over. We will use those.
You will need:
clay slicing blade
glass votive holder
Canes from tutorials
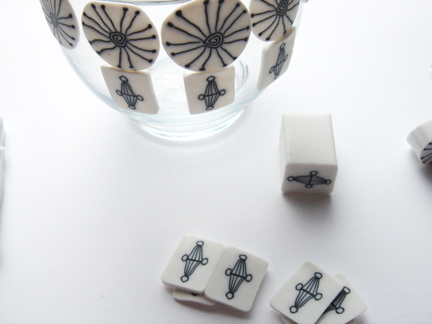
Start with the sputnik cane or I guess it could be a stylized dandelion, well whatever you want to call it.
Slice off the slices about 1/16" thick and place around the top of the glass.
Do not press on just place.
When you have them spaced evenly with about an 1/8" between all of them.
Press into place.
Here is a better view.
Add the second cane.
Place those below the others.
Press on firmly.
These are from the second cane and are left over.
Slice off some slices and round them a little with your fingers.
Place one of those between the big circles at the top of the rim of the votive holder.
Now I have added the pieces left over from the dandelion cane and placed those between the rectangle canes.
I added some of the spiral, basically I am building a net of canes around the top of the glass. I can have small open areas as long as all of the canes are connected together.
I rolled the spiral cane down to about 1/4" and added one to each of the bottoms of the rectangles.
Bake in a pre-heated 275 degree oven for 1/2 hour, shut off oven, and let cool in the oven.
Add a votive and you are good to go!
Showing posts with label make it yourself. Show all posts
Saturday, August 27, 2011
Sunday, January 24, 2010
Friday, January 22, 2010
Valentine Votive
This little votive is very easy and it uses a previously used glass votive holder. I love the shape of this one and I also like making it in to something useful instead of throwing it out or in the recycling.
I love recycling glass and I think that polymer clay gives me this option every day, by using bought, spent or exhausted items and making something beautiful out of it.
And Oy would this make a lovely gift for your mother!!! LOL!
White, Olive, and Red Cernit
Clay Blade
Needle tool or needle
Used glass votive holder
2 paper towels or an old towel/rag

Clean the glass by putting it in a warm oven, under 200 degrees F.
When the wax melts, save it to a can or pour it out in the trash.
Take a paper towel and clean out the glass while holding it with an old towel.
I find the labels are easier to get off when the glass is hot.
Clean the glass with glass cleaner or white vinegar.
Condition and pinch off little pieces and roll in to balls that are about 1/2" in diameter.
Then cut some in half with your clay blade so you have some smaller hearts.
Make 14 or 15 hearts, small and large. You may not use them all, but you will have them in case you might want to add more than I have.
A little border of hearts around the top rim would be nice too.
Roll the balls in to little teardrops and then flatten the teardrops between your finger and thumb till it is about 1/4" thick or a little thinner. Use the needle to make an indentation in the middle of the wide part of the flattened teardrop.
Set these aside.
You might want to wash your hands before you condition the green. I didn't but you might.
Mix a 1/4 block of olive with a 1/4 block of Opaque white together until it is one color.
Pinch off little balls about 1/2" in diameter.
Cut some of those in half.
Roll the larger balls in to little coils about 2" long and roll the smaller ones in to smaller coil varying the sizes and lengths.
Pinch one end of the coil in to a point.
With the back of the clay blade make a mark in the middle for a vein.
Place some leaves varying the lengths as you place them on the votive.
Where the shorter ones are, you can add a heart as if it is a flower.
Or even maybe two flowers in one section.
I pull the end with the pinch of the long leaf back a little when I put it on.
Make sure that when you put the hearts on that they are attached to the leaves.
When you put the leaves on make sure that they are touching each other.
If you have a straight sided votive that you are using you may want to use some of the Weldbond or Ultimate glue on the back of the leaves to hold them in place after baking.
Since the leaves wrap the bulge of the glass on this votive, they are less likely to come off.
Bake the whole thing in the oven for 1/2 hour at 275 degrees F and let cool in the oven until you can touch it.
I love recycling glass and I think that polymer clay gives me this option every day, by using bought, spent or exhausted items and making something beautiful out of it.
And Oy would this make a lovely gift for your mother!!! LOL!
White, Olive, and Red Cernit
Clay Blade
Needle tool or needle
Used glass votive holder
2 paper towels or an old towel/rag

Clean the glass by putting it in a warm oven, under 200 degrees F.
When the wax melts, save it to a can or pour it out in the trash.
Take a paper towel and clean out the glass while holding it with an old towel.
I find the labels are easier to get off when the glass is hot.
Clean the glass with glass cleaner or white vinegar.
Condition and pinch off little pieces and roll in to balls that are about 1/2" in diameter.
Then cut some in half with your clay blade so you have some smaller hearts.
Make 14 or 15 hearts, small and large. You may not use them all, but you will have them in case you might want to add more than I have.
A little border of hearts around the top rim would be nice too.
Roll the balls in to little teardrops and then flatten the teardrops between your finger and thumb till it is about 1/4" thick or a little thinner. Use the needle to make an indentation in the middle of the wide part of the flattened teardrop.
Set these aside.
You might want to wash your hands before you condition the green. I didn't but you might.
Mix a 1/4 block of olive with a 1/4 block of Opaque white together until it is one color.
Pinch off little balls about 1/2" in diameter.
Cut some of those in half.
Roll the larger balls in to little coils about 2" long and roll the smaller ones in to smaller coil varying the sizes and lengths.
Pinch one end of the coil in to a point.
With the back of the clay blade make a mark in the middle for a vein.
Place some leaves varying the lengths as you place them on the votive.
Where the shorter ones are, you can add a heart as if it is a flower.
Or even maybe two flowers in one section.
I pull the end with the pinch of the long leaf back a little when I put it on.
Make sure that when you put the hearts on that they are attached to the leaves.
When you put the leaves on make sure that they are touching each other.
If you have a straight sided votive that you are using you may want to use some of the Weldbond or Ultimate glue on the back of the leaves to hold them in place after baking.
Since the leaves wrap the bulge of the glass on this votive, they are less likely to come off.
Bake the whole thing in the oven for 1/2 hour at 275 degrees F and let cool in the oven until you can touch it.
Labels:
Cernit,
diy,
hearts,
make it yourself,
valentines day,
votive
Thursday, September 17, 2009
Batty!!!
Could you use one of these on Halloween night?
This would also make a great magnet or make the design smaller for a pair of earrings, but this is simple and fun and can be done in a ½ hour.
I have the chains available through the http://www.clayfactory.net/ for 2.00 each, 1.00 each (sold in packages of 5, one color), it has everything you need; silver or gold plated, the jump rings, and the clasp. They are about 15 1/2" long from jump ring to jump ring and they have an extra 1 7/8" adjustment chain too! If they are not up there when I get these posted, just ask Howard.
Using purple Cernit and Purple glitter from http://artglitter.com/
Links will take you to the page at http://www.clayfactory.net/ where the products are.
Black Cernit
Red Cernit
Round cutter set- Makin’s Clay
Clay Blade
Craft Knife
3/16” teardrop cutter
7/16” round cutter
Large and small ball stylus
Pasta Machine
3 hooks with leg
1 chain set (Link finally added, YAY!!!)
1. Condition a ¼ block of the black clay until smooth and creamy, then roll out in the pasta machine on the thickest setting and fold the clay sheet in half to double the thickness or roll out with a glass jar until about 3/16” thick, using the largest and smallest circle cutter from the Makin’s clay circle set cut out one of each size.
2. Cut the largest cut out circle in half.
3. Place the two halves together so they look like camel humps or mountains.
4. With the 7/16” round cutter cut out 3 halves of the circle in each half of the big circle.
5. Take the cut out that used the smallest cutter and roll it in to a ball and then roll it in to a pear shape.
6. Place over the center of the two large cut out halves right in the middle and press down firmly with out smashing too much.
7. Place the large ball stylus in to the center of the pressed on pear shape and pull down to form a mouth.
8. Roll out some conditioned red clay on the 5th thickest setting and use the small 3/16” cutter to cut out two teardrops.
9. Place one over the mouth a little to the right of center.
10. Place another over the mouth on the left of the other.
Sometimes if the red clay sticks in the cutter you can place the cutter squarely and flush on to the clay you want it on and pull the cutter back very fast and get the piece to stick to the clay you are putting it on, this doesn’t always work and takes a little practice.
Otherwise push out the shape and turn it over so you will not see the indent from the plunger. Then place where you want it to go.
13. With the craft knife make a mark in the red ball that goes north to south in the middle for the bats tongue.
14. Using the 3/16” teardrop cut out 3 teardrops out of the black clay that is rolled out on the thickest setting.
15. Roll all of the pieces in to balls.
16. Roll two of the balls in to little teardrops.
17. Roll one of the balls in to a little coil that is about ¼” long.
18. Put the two teardrops on each side of the top of the bats head for ears.
19. Mark each ear by pressing the large ball stylus in to the teardrop at the bottom of it close to the head.
This will also help attach the ears to the head.
20. Place the little coil over the red teardrops for eyes and mark in the middle of it with the craft knife to make eyebrows.
21. Roll out another piece of the black clay on the 5th thickest setting and cut out another 3/16” teardrop.
22. Cut that in half and roll both halves into very small balls.
23. Place on the red teardrops for pupils in the eyes and press in to place.
24. Using a small ball stylus “draw” on the wing divisions.
25. Insert the hooks with legs in to the wings and at the bottom of the body or leave them off if this is going to be used for something else.
26. Bake in a 275 degree preheated oven for 30 minutes
27. Shut off oven.
28. Let cool.
Add chain and dangles
This would also make a great magnet or make the design smaller for a pair of earrings, but this is simple and fun and can be done in a ½ hour.
I have the chains available through the http://www.clayfactory.net/ The eye hooks are placed in to the bat where I want them and they have a shart leg with a hook that sticks in to the clay. I press the clay down around it once I insert it and the hook doesn’t come out. I used 22 gauge non tarnish silver or non tarnish brass wire to make the dangles on the bottom and some other beads I had made. The glitter beads can be made from the instructions here: http://mariesegal.blogspot.com/2009/06/glitter-beads.html
Using purple Cernit and Purple glitter from http://artglitter.com/
Links will take you to the page at http://www.clayfactory.net/ where the products are.
Black Cernit
Red Cernit
Round cutter set- Makin’s Clay
Clay Blade
Craft Knife
3/16” teardrop cutter
7/16” round cutter
Large and small ball stylus
Pasta Machine
3 hooks with leg
1 chain set (Link finally added, YAY!!!)
1. Condition a ¼ block of the black clay until smooth and creamy, then roll out in the pasta machine on the thickest setting and fold the clay sheet in half to double the thickness or roll out with a glass jar until about 3/16” thick, using the largest and smallest circle cutter from the Makin’s clay circle set cut out one of each size.
2. Cut the largest cut out circle in half.
3. Place the two halves together so they look like camel humps or mountains.
4. With the 7/16” round cutter cut out 3 halves of the circle in each half of the big circle.
6. Place over the center of the two large cut out halves right in the middle and press down firmly with out smashing too much.
7. Place the large ball stylus in to the center of the pressed on pear shape and pull down to form a mouth.
8. Roll out some conditioned red clay on the 5th thickest setting and use the small 3/16” cutter to cut out two teardrops.
9. Place one over the mouth a little to the right of center.
10. Place another over the mouth on the left of the other.
Sometimes if the red clay sticks in the cutter you can place the cutter squarely and flush on to the clay you want it on and pull the cutter back very fast and get the piece to stick to the clay you are putting it on, this doesn’t always work and takes a little practice.
Otherwise push out the shape and turn it over so you will not see the indent from the plunger. Then place where you want it to go.
11. Cut out another 3/16” teardrop and roll it in to a ball.
12. Drop in to the bottom of the hole for the mouth.
13. With the craft knife make a mark in the red ball that goes north to south in the middle for the bats tongue.
14. Using the 3/16” teardrop cut out 3 teardrops out of the black clay that is rolled out on the thickest setting.
15. Roll all of the pieces in to balls.
16. Roll two of the balls in to little teardrops.
17. Roll one of the balls in to a little coil that is about ¼” long.
18. Put the two teardrops on each side of the top of the bats head for ears.
19. Mark each ear by pressing the large ball stylus in to the teardrop at the bottom of it close to the head.
This will also help attach the ears to the head.
20. Place the little coil over the red teardrops for eyes and mark in the middle of it with the craft knife to make eyebrows.
21. Roll out another piece of the black clay on the 5th thickest setting and cut out another 3/16” teardrop.
22. Cut that in half and roll both halves into very small balls.
23. Place on the red teardrops for pupils in the eyes and press in to place.
24. Using a small ball stylus “draw” on the wing divisions.
25. Insert the hooks with legs in to the wings and at the bottom of the body or leave them off if this is going to be used for something else.
26. Bake in a 275 degree preheated oven for 30 minutes
27. Shut off oven.
28. Let cool.
Add chain and dangles
Thursday, September 3, 2009
Bones and Stones
Now the mayhem and getting ready for the season I love so much begins. I have been waiting for this forever it seems.
Wear a fabulous knuckle necklace, a bone to pick, to a spooktacular evening of elegance ala a stony entrance with appendages dangling from your neck.
*all links in this list will lead to my husbands http://www.clayfactory.net/ store if you are looking for these products*
You will need:
Cernit phthalate free polymer clay 1- 2 ounce package of opaque White, Caramel, and Granite
7/16” round or teardrop cutter
Ruler
Slicing blade
Ne-Opaque Black or brown
Stencil Brush ½ inch round
Bamboo skewer
Old towel
Cylindrical glass jar or rolling pin
Copper wire 14 gauge
Wire tools round nose and side cutters
Mix 4 parts of white to 1 part of caramel until it is one color
Roll out a coil that is 3/8” to 7/16”
Cut in to 2” sections
I use17 sections for the necklace and 3 sections for the bracelet
Place one of the sections on the top of your fingers and roll the fingers over the coil and smash the coil into your fingers
Sometimes I even have to squeeze my fingers down with my other hand to make very deep impressions
Do this to all of the 20 sections you have
Poke holes in all 17 sections at one end for the necklace
Cut 2 of the 4 in to 3rds, and 1 of the 4 sections in to 4ths (I show 2 of the sections cut in half I didn’t like them that long and decided not to use them)
Poke holes through the middle of each cut section you have made.
These will be for the bracelet.
Condition the granite clay and roll out to ¼ thick with a glass or rolling pin
Cut out circles or teardrops with the cutter
Roll those in to balls and flatten a little with your fingers
Pole a hole through the center of each one
Bake all of your bones and stones in a preheated 275 degree oven for 30 minutes, shut off the oven let cool.
When pieces are completely cool take the stencil brush and load it up with black or brown Ne-opaque and punch the color in to all of the bones.
Take the old towel and wet it a little and squeeze out the excess.
I have strung mine on to 14 gauge copper wire and bent hooks in each end for both the bracelet and the necklace
It doesn’t have to be fancy, just loops on each end like the bracelet will be fine.
Wilma Flintstone would be jealous.
Wear a fabulous knuckle necklace, a bone to pick, to a spooktacular evening of elegance ala a stony entrance with appendages dangling from your neck.
*all links in this list will lead to my husbands http://www.clayfactory.net/ store if you are looking for these products*
You will need:
Cernit phthalate free polymer clay 1- 2 ounce package of opaque White, Caramel, and Granite
7/16” round or teardrop cutter
Ruler
Slicing blade
Ne-Opaque Black or brown
Stencil Brush ½ inch round
Bamboo skewer
Old towel
Cylindrical glass jar or rolling pin
Copper wire 14 gauge
Wire tools round nose and side cutters
Mix 4 parts of white to 1 part of caramel until it is one color
Roll out a coil that is 3/8” to 7/16”
Cut in to 2” sections
I use17 sections for the necklace and 3 sections for the bracelet
Place one of the sections on the top of your fingers and roll the fingers over the coil and smash the coil into your fingers
Sometimes I even have to squeeze my fingers down with my other hand to make very deep impressions
Do this to all of the 20 sections you have
Poke holes in all 17 sections at one end for the necklace
Cut 2 of the 4 in to 3rds, and 1 of the 4 sections in to 4ths (I show 2 of the sections cut in half I didn’t like them that long and decided not to use them) Poke holes through the middle of each cut section you have made.
These will be for the bracelet.
Condition the granite clay and roll out to ¼ thick with a glass or rolling pin
Cut out circles or teardrops with the cutter
Roll those in to balls and flatten a little with your fingers
Pole a hole through the center of each one
Bake all of your bones and stones in a preheated 275 degree oven for 30 minutes, shut off the oven let cool.
When pieces are completely cool take the stencil brush and load it up with black or brown Ne-opaque and punch the color in to all of the bones.
Take the old towel and wet it a little and squeeze out the excess.
I have strung mine on to 14 gauge copper wire and bent hooks in each end for both the bracelet and the necklace
It doesn’t have to be fancy, just loops on each end like the bracelet will be fine.
Wilma Flintstone would be jealous.
Monday, August 17, 2009
Small Hand Mirrors
For the small hand mirrors you will need:
3” round mirror
Cernit Phthalate free clay in Black 2.2 ounce pkg
Brilliant Gold and Silver Pearl EX
Pearl-ex varnish
Victorian flexible push mold
Craft Knife
Clay blade
Applicator sponge
Clay dedicated Pasta Machine
All links above take you to my husband's store Clay Factory and to the page where the supply highlighted can be seen and purchased. Or you can visit the Clay Factory site a http://www.clayfactory.net/
1. Condition clay.
2. Roll out in your pasta machine on a thinner setting than the handled mirror, I used the 3rd thickest setting.
Put a thin layer of glue on the back of the mirror, let dry completely.
Place the back of the mirror on the sheet of clay.
3. Press the mirror down firmly.
4. Trim around the mirror with your craft knife leaving a 1/8” allowance
Press out all the air bubbles, you will be able to see them.
5. Press the clay up around the edges of the mirror.
6. Trim off the excess with your clay blade.
7. Roll out another sheet of clay on the 3rd thickest setting.
8. Cut a strip ¼” wide and long enough to go around the outside of the mirror.
Cut one end of the strip at an angle.
Press the strip on to the outside of the mirror attaching it to the clay on the outside edge.
9. Trim the end that’s left with your craft blade and butt the edges together.
Smooth your seams gently with your finger.
10. Mold little pieces of the Victorian mold and place on the strip.

Here you can see that I am not molding whole pieces, just parts of them, I am using ¼” balls of black in the mold
11. When you are done embellishing the mirror place a small amount of silver powder into a Ziploc baggie, zip it closed and shake the powder around in the bag
Place the mirror into the bag and shake the powder onto the clay around the mirror, again you will get powder on the mirror but you will be able to wash it off after you bake it
12. Now I take my applicator sponge and on the front of the mirror I daub on the Brilliant gold powder lightly on the high spots
13. Bake in a preheat 275 degree oven for 30 minutes
14. Shut off the oven and let cool
Paint with Pearl-ex varnish, let dry and place back in a preheated 200-degree oven for 15 minutes, shut off oven and let cool
Place into a little bag and this little beauty is ready to give as a gift or go right into your own purse. Wouldn’t this make a great bridesmaid’s gift???
3” round mirror
Cernit Phthalate free clay in Black 2.2 ounce pkg
Brilliant Gold and Silver Pearl EX
Pearl-ex varnish
Victorian flexible push mold
Craft Knife
Clay blade
Applicator sponge
Clay dedicated Pasta Machine
All links above take you to my husband's store Clay Factory and to the page where the supply highlighted can be seen and purchased. Or you can visit the Clay Factory site a http://www.clayfactory.net/
1. Condition clay.
2. Roll out in your pasta machine on a thinner setting than the handled mirror, I used the 3rd thickest setting.
Put a thin layer of glue on the back of the mirror, let dry completely.
Place the back of the mirror on the sheet of clay.
3. Press the mirror down firmly.
4. Trim around the mirror with your craft knife leaving a 1/8” allowance
Press out all the air bubbles, you will be able to see them.
5. Press the clay up around the edges of the mirror.
6. Trim off the excess with your clay blade.
7. Roll out another sheet of clay on the 3rd thickest setting.
8. Cut a strip ¼” wide and long enough to go around the outside of the mirror.
Cut one end of the strip at an angle.
Press the strip on to the outside of the mirror attaching it to the clay on the outside edge.
9. Trim the end that’s left with your craft blade and butt the edges together.
Smooth your seams gently with your finger.
10. Mold little pieces of the Victorian mold and place on the strip.

Here you can see that I am not molding whole pieces, just parts of them, I am using ¼” balls of black in the mold
11. When you are done embellishing the mirror place a small amount of silver powder into a Ziploc baggie, zip it closed and shake the powder around in the bag
Place the mirror into the bag and shake the powder onto the clay around the mirror, again you will get powder on the mirror but you will be able to wash it off after you bake it
12. Now I take my applicator sponge and on the front of the mirror I daub on the Brilliant gold powder lightly on the high spots
13. Bake in a preheat 275 degree oven for 30 minutes
14. Shut off the oven and let cool
Paint with Pearl-ex varnish, let dry and place back in a preheated 200-degree oven for 15 minutes, shut off oven and let cool
Place into a little bag and this little beauty is ready to give as a gift or go right into your own purse. Wouldn’t this make a great bridesmaid’s gift???
Subscribe to:
Posts (Atom)