Wednesday, March 30, 2011

African Trade Beads- part 6

This is a series of African trade bead primary patterns, this is part 6,


you can see part 1 here,
http://mariesegal.blogspot.com/2011/03/african-trade-beads-part-1.html

you can see part 2 here,
http://mariesegal.blogspot.com/2011/03/african-trade-beads-part-2.html

you can see part 3 here,
http://mariesegal.blogspot.com/2011/03/african-trade-beads-part-3.html

you can see part 4 here,
http://mariesegal.blogspot.com/2011/03/african-trade-beads-part-4.html

you can see part 5 here,


Well, I am going to post this on a wednesday even though it is saved for Wonders. I do not feel bad doing this because it is a wonder I am still moving through this series.  I have taken and edited 100's of pictures, given a lot of techniques, and I find, I am still scratching the surface here, so I continue.

As always click on pictures to make them larger.
You will need:
Flower canes already made
the one made in part 5 http://mariesegal.blogspot.com/2011/03/african-trade-beads-part-5.html

and the one made in part 3 http://mariesegal.blogspot.com/2011/03/african-trade-beads-part-3.html
Clay Blade- SB
Bamboo Skewer- 2mm
Ruler (if you wish)
Needle Tool- PRO

Links for products will lead to my Hubby's store http://www.clayfactory.net/  

Thank you for shopping at the Clay Factory, not just a clay store anymore.;-D


Roll the cane from part 5 down to a little less than 3/8".


Cut the cane piece in to 3/8" pieces or as long as the are in diameter.


You can use the ruler to cut your beads or you can use the first cut bead to measure the others you cut.


Roll the bead gently with your finger and thumb to take off the high spots and round the bead. Once you get it pretty round you can roll it faster in your palms.


Once the bead is round you can pierce the bead by drilling through one side with the needle tool.
You can see the needle starting to push out the bead on the opposite side.
Drill out the needle tool.


Turn the bead over to the opposite side and drill the needle tool in to the hole to even out the shape of the bead and round both holes out.


Even on both sides. Tah-dah!
Bake on a piece of corrugated cardboard box top and bake the bead sitting on the hole.
If you bake the bead sitting on the hole so that if there is a flat spot from settling while baking it will have another bead there when strung and will not be seen.


Next:
We are going to make a block of cane rods that can be used for making beads or for rolling out canes sheets for covering items.
You will need the cane from part 3
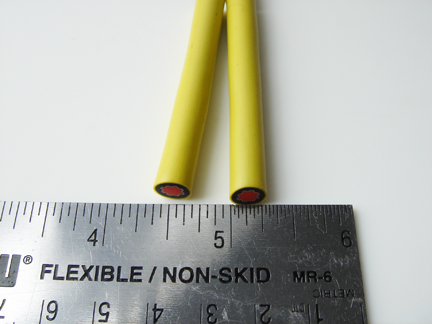
Roll it down to 3/8" or a little under.


Cut the cane rods 2 1/4" long.


Place 3 together.


Cut 3 more and stack them in the dips of the others.


Cut 3 more and stack in those dips.
This is them standing on the end of the canes.


Cut these in half.


Move the front half in to the left side. It will fit right in there like it was made to go there.


Like this.


I did not feel the cane was going to be long enough so I added another cane to the bottom right side continuing the pattern.


One to the middle and one to the top.


Stand the block on one of the ends.
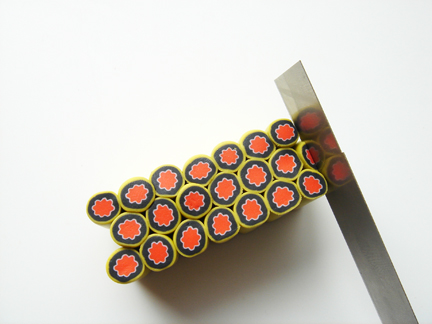
Slide the blade down the outside of the top cane and the bottom one cutting the middle one in half. It will probably stick to your blade.


Move the cane half to the left side to make the straight sides.

The cane ends now become what I call the face of the block.


Lay it on the sides and compact the top and bottom of the block, not the face of the block, with the thumb mound of your palm.


Turn the block on the sides of the block and compact the canes together.


The first cut should just even the face and take off some of the bulging cane face.


Take another slice that is about 3/16".


With your blade at an angle bevel one edge.


Then bevel the opposite edge.


The slice will look like this.


Lay your skewer in to the middle of this slice down the length.
Pull up the outside edges around the skewer.
Match the edges and close them around the skewer.


Push the edges down and press gently together.


Roll on the work surface to smooth the seam together all the way.


Grasp the whole length of the tube bead with your hand and break it loose from the skewer by twisting the whole thing gently.


It may even be out of shape or lumpy.


Roll again on your work surface to even it out.


Roll the blade and the skewer forward to trim the end of the bead off for a straight edge or end.


With the blade laying flat on the surface to measure your next bead length.

I have the sharp edge on the left side of the blade.


Rock the sharp edge up and roll the skewer and the blade forward to make the next cut. Always hold the blade straight up and down.


I cut as many beads (3/4") as I can this way.
If I have a small section of bead left I cut small spacer beads.
Usually about 1/8" to 3/16" long.


By pressing gently on the bead (3/16") with my thumb and forefinger I can bulge the sides out a little.


By taking one of the 3/4" tubes I can make a nice barrel bead by pressing with my thumb and forefinger evenly in the middle slowly.


Here are the beads so far. I am stopping here.
I will continue with the rest of the beads in the next part.
Probably Thursday.
Ta ta for now!

4 comments:

  1. I have only one word for all this...patience.

    ReplyDelete
  2. Marie, you are just AMAZING! :) Theresa

    ReplyDelete
  3. Beautiful... I had no idea that this is how they are made.

    thank you for sharing and teaching me something new.

    best wishes
    Robyn

    ReplyDelete
  4. I particularly love those little round beads. Thanks for sharing it all!
    Cara

    ReplyDelete

I am so glad you stopped by. Please leave your words of wisdom. I look forward to them and I so enjoy reading them all.
Live to love, Love to create, and create to connect.
Marie

www.mariesegal.com
www.clayfactory.net