I thought you would like to see how I make the can boxes.
Never throw another can away again.
LOL!!
You will need:
4 ounce Ortega chili can (You can use any can size but the cutters I am using are for the 4 ounce size can) to find the right circle cutters, put a cutter inside the lid top to see which cutter will work and then use the nest size up for lid top.
Cernit Clay in
Orange
Light Green
Gold
Caramel
Opaque white
Black
Poppy red

Yellow
Large block of Biscuit
1/2" Oval Kemper cutter
3/16" round Kemper cutter
1 1/8" round cutter
2" round cutter
2 1/2" round cutter
2 3/4" round cutter
Clay slicing blade
Knitting needle or bic stic pen
I mix all of my colors equally with the same amount of biscuit.
Condition to one color.
Cut off top of can with a side cutting can opener.
Put a thin layer of the Ultimate glue on the lid and the bottom of the inside of the can bottom and the top.
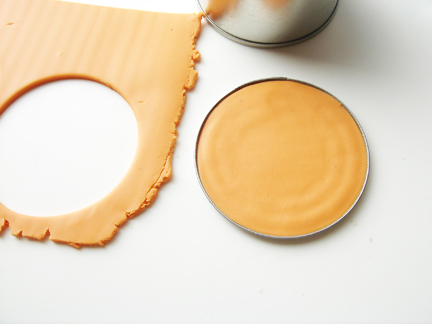
Roll out orange on the thickest setting.
Cut out 2 circles that fit in the top and the bottom of the can and the lid.
Place Orange clay circles in to the bottom and the top and start pressing gently in the center of the circles and working your way out to the edges to press out air bubbles. It will also push clay to the edges if you have a little bit smaller clay circle.
Now use the next cutter size up from the one you used to fill the top and the bottom and cut out one of those.
Place on top of the lid.
Press into the clay already in the lid and fold over the edge just slightly.
Roll out a strip of orange clay on the 3rd thickest setting and cut off the bottom for a straight edge.
Make sure it will wrap around the whole can. I forgot to measure it. ;-D
Place a layer of glue on to the surface of the can with your finger.
Cover the sides and the bottom edge.
Wrap around can and over leading edge to make a slight mark so you know where to cut the strip.
Press out air as you wrap around.
Cut just inside the line close to the can.
Match edges together and smooth with finger or tool.
Hold blade at an angle and trim around the top of the can.
See how blade is angled down and rotate the can and trim.
Even out the edge and press to the top of the can side.
Turn the can over and press the side clay to the bottom of the can clay.
I use a 1/8" metal rod to make indents in the side of the can like the indents in the side of the pumpkin.
I make 3 close together for registrations marks.
Like so. Some of the lines do not have to go from the top to the bottom and can be just marks on the top side or the bottom side.
Using the rod again, place the lid on the can and mark from the side of the lid where a top mark on the can starts to...
The middle of the can.
You can see my three lines for registration already marked on the top of the lid.
All the top side marks continued on the top of the lid to the center of the lid.
Place you blade in to the side of the lid and gently pop off the can.
Take a 1" ball of Opaque white and mix with a 1/2" ball of caramel till one color.
Pinch off enough for a 1" ball and roll till smooth.
Roll into a kind of a bowling pin shape.
Flatten around the top edge on the smallest side of the "bowling pin".
Put a Little dip in there.
Now flatten out the bottom.
Pull out little pinches of the bottom and roll between your fingers to lengthen.
I made five little fingers in the bottom all of varying lengths.
Place in the center of the lid and use the metal rod to mark up the sides of the stem.
I start in the dips between the little fingers and go up the side of the stem.
Stay tuned for part 2...