Showing posts with label Marie Segal. Show all posts

Friday, June 16, 2017

Resistor Arts at Etsy

My friend Don Geer from Resistor Arts on Etsy https://www.etsy.com/shop/ResistorArts has just opened his shop at Etsy.
He is making my man in the moon pendants with my permission. I made the mold quite a few years ago and he has started selling them. YAY!
You can buy them in his shop on etsy, at the link above.
I seriously love this piece and Don has done a fabulous job of reproducing them in silver.

He uses the lost wax casting methods to make the piece from an original mold. Thanks Don, these are wonderful and I love the one you made for me.

Wednesday, June 14, 2017

I wanted to share with you some of the Candle shades that my friend Maria Jam Brown has been making lately.
They are made from Cernit polymer clay and alcohol inks and mica powders. You can find all of these products in my store the Clay Factory. www.clayfactory.net
I think these are amazing in their execution and drama, so simple yet SO wonderful.
Lesson here for me too, complex and complicated is not always better.
Thank you for this Maria and thank you for letting me share these beauties.
Enjoy the expression, joy, and drive of something well done!
These are stunning!
This is excerpt from the Facebook post I made in my store pages.

This candle holder is made by Northwest Artist and a cartographer at IRL in Seattle, Washington, Maria Jam Brown. I love the quality of nature Maria Jam Brown has captured in the Polymer clay with ink colored translucent Cernit.
From Maria's post,
"Today's project: translucent Cernit and mica gold mixed with alcohol inks to create an amber, gold, and rosy quartz candle holder. It looks a bit like it was carved from Himalayan salt! (I had to test it out with a tea light before giving it as a gift tomorrow. ☺)"
Here is Maria's on line studio with pieces she makes, tutorials, and info at her page at Blonde Crow Studio.
http://www.blondecrowstudio.com
# Cernit
Here is the very first candle shade she made.


Here are the new Candle shades she has been making! I love the colors and the effect she is getting and how about those trees?


Monday, May 8, 2017

New cutters!

I am happy to announce that Kemper has added two new cutters to the 3/16" and 5/16 cutter styles with a small square and a small triangle. We are loading different sets in to www.Thehoarderscloset.etsy.com and in to www.Clayfactory.net stores as we get them photographed. you will be able to by them in the full square set, full triangle set, all the 3/16" cutters and all the 5/16" sets also, even just the two square and triangle sizes.
This is a very nice thing!

http://www.clayfactory.net/kempertools/pages/pattern-cutters-kemper-tools.htm

https://www.etsy.com/listing/529115361/brand-new-4-piece-new-square-and?ref=shop_home_active_2


These are the two new cutters added to the square and triangle sets
If you already have all the cutters you will be able to buy just these individually also


The Square is now a 7 piece set as well as the triangle set now

Now the smallest cutter set in 3/16" has a triangle and square 

Wednesday, May 3, 2017

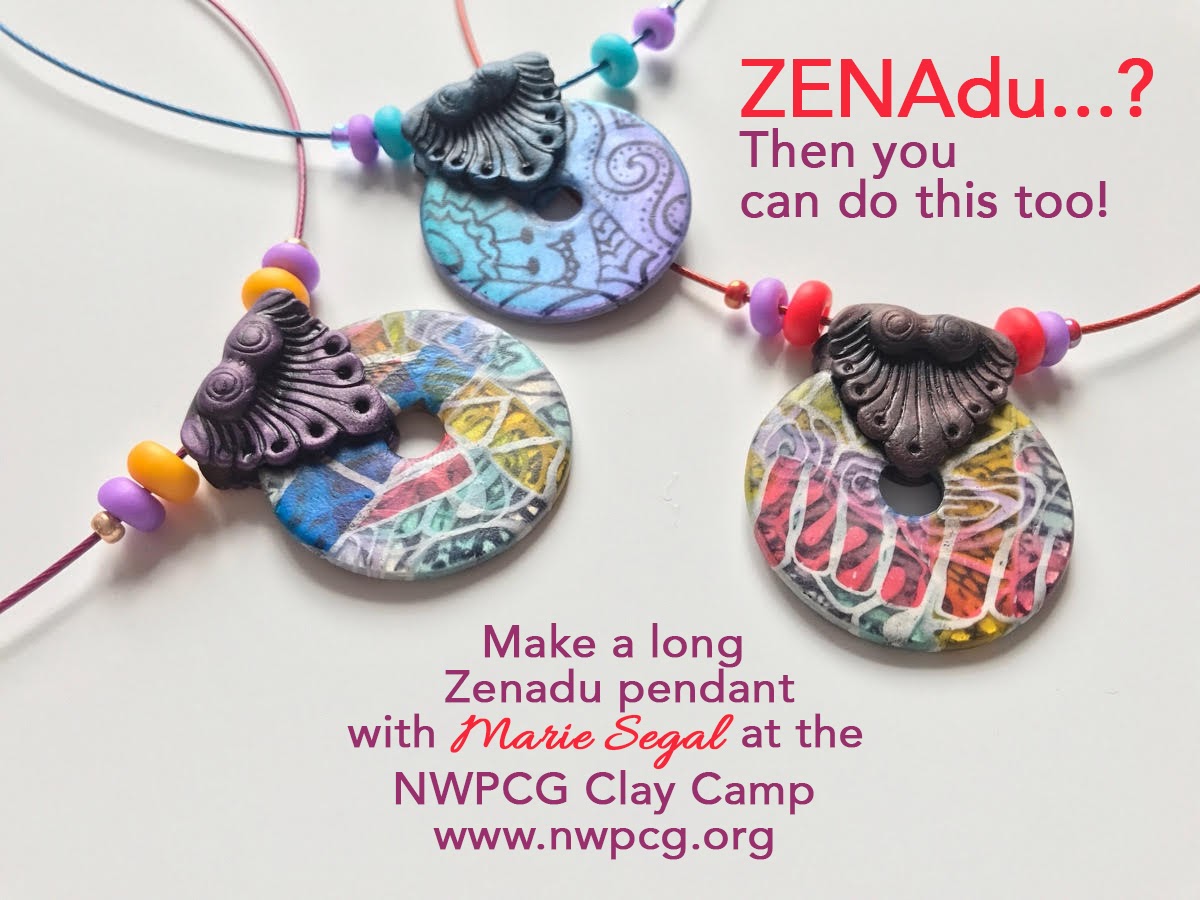
ZENadu Pendant at Clay Camp!

Long Zenadu Pendant 
I just wanted to let you know that if you are taking the ZENADU Pendant class from me at Clay Camp in the great NorthWest of America, put on by the NWPCG you will also learn how to make this happen there small Pendant with the same technique.
So make the Zenadu Pendant and you can do this Pendant also.
Classes are still open, come for one, come for all of them, or come for a day or two, or the whole damn time. You will not regret it.
www.NWPCG.org
Clay for my classes is being donated by me and my on line store www.clayfactory.net

Short Zenadu Pendant


Tuesday, May 2, 2017

Pendant light shade re-do!

You know the shades they have for the lights that hang down low over your bar or kitchen sink, pendant lights? They have the best shades, very artsy! Thick, nice, clear, or frosted textured and or smooth.
Many colors!
Well, what happens when you break one and you have to replace all the shades because you can not find the ones you have anymore...out of style?
You replace the Pendant lamps with new shades, get a face lift for the kitchen,  and make something out of those shades.
Lol!
I got these from a friend that found a bunch of them. Gave a few to me at clay day, and told me to make something, it was so funny because a couple of days before I had pulled out a Lamp shade from a floor lamp that I absoluetly loved and had broken. I could not through the glass away. I loved it! I was going to and then this hit me. Like a slap upside the head it came to me.
I went to clay day and then more glass lamp shades came my way. bam! There is the idea, ready and waiting in the back of my trap.
There is a saying that if you see something three times look in to it! It is trying to tell you something.
I don't really wait for three anymore! More that once within a week I check it out!

Here is the result of the shades and below is the large one I am doing. About punch bowl size I would say. Perfect for table top, with dried flowers or ornamental fruit in glass.


Sunday, April 30, 2017

Mixed media Class at Clay Camp with Bea Grob

Looking for the perfect mother-daughter bonding activity? Check out this Mixed Media Dolls class by Bea Grob! In this class, you will stretch your creativity to make your own studio spirits or alter egos! Full details at www.nwpcg.org. Registration deadline is on May 9, don't let this chance pass by, sign-up now! If you have friends who may be interested in this class, please feel free to tag and repost. Thanks and see you there!
www.nwpcg.org

Learn this incredible technique directly from the inventor of the Ripple Blade Effect - Marie Segal in this NWPCG Clay Camp Class. There are so many applications for this technique so be prepared to level up your polymer clay skills. Sign-up now at www.nwpcg.org. Clay Camp runs from May 18-22, 2017 at Camp Huston, Gold Bar, WA. You can choose to attend the full Camp Session (which is more fun! You can work in the 24-hour craft room with fellow creatives and enjoy the delicious camp food without worries of cooking and cleaning) or if you can't make it for the whole duration, select day(s) or class(es) you want to attend. Don't think twice – register now at www.nwpcg.org. Registration deadline is May 9, 2017.
That's me!


Saturday, April 22, 2017

Northwest Polymer clay Guild Clay Camp in May

Happy Earth day!
Have a great weekend!

This is one of the classes I will be teaching at clay camp in Gold Bar, Washington, in the middle of May.
It is at Camp Huston, a beautiful Place in a northwest forest of green trees, rocks, and a gorgeous mountain, will watch over us at all our meals. It is one of the most relaxing and truly beautiful places I have been in my life.
Hiking trails all over the place, a great group of people, good food, fun and games, laughter, and creative frenzy.
 Wicked Little Bowls is one of my half day classes.

 You can find  he info at http://www.nwpolymerclayguild.org/?page_id=1460

Thursday, April 20, 2017

Coming to the Seattle Area next month!

The Northwest Polymer Clay Guild Clay Camp registration is now open! Happening on May 18-22, 2017 at Camp Huston, Gold Bar, WA, Clay Camp is open to everybody interested in learning how to use polymer clay and its many creative uses. At Clay Camp, you can look forward to fantastic creative company, 24-hour workroom, fabulous food (with vegan, Gluten-free, you name it options) and fantastic classes. And did we mention the fantastic, creative company? Sign up now, go to www. nwpcg.org. See you there!


Wednesday, January 4, 2017

The year begins anew! Welcome 2017!

Howard and Marie Segal 2016
2017 is here and I for one am ready for the changing. The Energy of the new year is floating in and it "feels" good. I feel good, if a little beat about the head from last year, but still standing and increasing my skills.
I am going overseas to Germany to teach at Galerie Freisleben in Uber sea, I am grateful for the chance to do this, thank you Ariane, this is a beautiful studio and bed and breakfast, a wonderful place to play with the creative spirit.
A dream come true actually.

Here is the link to the workshop page  https://www.galeriefreisleben.de/workshops-2017/
If you click on the Galerie Logo square at the top of the left side of the link above, it will show you the wonderful Galerie in beautiful pictures. Otherwise all the links for all the classes that Ariane is giving for 2017 are all listed in the page the link above opens.
Please have a look there are some amazing classes here every year!
Iris Mishly, Angela Garrod, Christine Dumont, and Melanie West to name this year's lineup, oh, and me!
Sign up for the newsletter also!
Come see me if you have the chance for a full weekend of playing with the creativity in the room.  LOVE that!
For the rest of you that read my blog, may the new year of 2017 be gently kind to you this year and may it be filled with health, happiness, and abundance in every way!
Be kind  you have no idea the things people are going through inside or in their lives, be the love that is missing there!
Love and hugs to all of you,
Marie and the better half in my life, Howard

Saturday, September 17, 2016

Cernit red translucent fixes

There have been a couple of changes in the red/ruby translucent.
I am going to show you how I usually do with things that could be potentially be a real pain when manufacturing for myself.
As in yarn dye lots, there are always differences and then there is the added changes in products for using in polymer clay being in the safety and availability ever changing field!
So I usually go with the flow on the changes coming forward nowadays and hack the color. Or as close as I can get!
 OK, the skull in the middle is the older red/ruby, the one on the right is the new red/ruby, and the one on the left is the red/ruby I made from the new red and the Yellow/Amber translucent color.


They are all slightly different: the one on the right, the new one, is very Carmine-y and bluer, It is lovely in its own way. I thought this may be a better mixing red, it is but I will get to that later. Notice the darker skull at the bottom right, that is the purple I got from 3 part  Ruby and 1 part Sapphire, it is a gorgeous purple and rich, if you added another part of the new ruby, you will a bight intense purple which most people know as violet.
One advantage of this new red is pleasing purples and oranges from it's mixing abilities.

The one in the middle is the oldest red/ruby color package that I had, it is definitely Warmer in color.
The one on the right is the color I mixed up the first time: it is 3 parts Ruby and 1/2 part Amber, it is not warn enough to match or get close to the middle colored skull. But is it good and you can barely see the difference, so it probably needs maybe 1/4 part more. I can tell that from these sheets below.  

The red on the left is the mixed color I made after using the new red 3 parts and the amber 1 whole part now to  see where to go next with the color. I believe that the paragraph above is the answer with 3/4 part amber to 3 parts Ruby.


This is the purple I mixed up with the new Ruby Color as per my last shipment.

The purple on the right is the one I mixed up from the formula 3 parts ruby and 1 part sapphire. The one on the left is the purple that we have available to us in the Cernit palette, Now these work fabulous together and can be the other color you need in your purple shades that you use.


The photo here on your right with one piece of purple clay I am holding. Isn't it gorgeous? It is also yummy hit you in the face face color, that I love so much. But when you use it with light behind it, oh my goodness. This is wonderful!


Here is the whole palette of all the colors mixed and otherwise and this a great bunch of colors that shout come play with me!
All of these Cernit translucent sheets are rolled out on the thinnest setting in my machine. My setting go from the thickest being 0 and the thinnest being a 9.
I am quite pleased at how Cernit does this so very well.
Just roll down one thickness at a time to get sheets like this! Oh and do not try when the clay has just been made, it is too smooshy for that!


Need some incredible translucent clay to play with?
www.clayfactory.net/
http://clayfactory.net/cernit/cernit-polymer-clay-translucent-colors.html

Saturday, September 3, 2016

ToolTime with Marie #1- WS tool


I carry a ton of tools at the Clay Factory, I thought it might be nice to show you a few of them.
This first one on the list is mini wire tool, used for Sgrafitto, the wiki definition for the word, give it a click.
Or for carving out small areas, like around the eyes when sculpting. I am also playing with tool for texturing.
This is the way I learned sgraffito on Ceramics back in the early 70's.
This is a lovely little wire tool with many applications and many possibilities.
 
I am going to show you "A" way to use it with Polymer clay-Cernit, Pinata inks, and the WS tool, called a wire stylus by the manufacturer.
Here is the link the the picture of it.
http://www.clayfactory.net/kempertools/pages/WS.htm
Here is how much it costs from my Clay Factory
http://www.clayfactory.net/kempertools/Page9.htm 
Scroll down the page a little 

You will need:
WS tool
Pinata Inks
Porcelain White Cernit
Pasta machine or stainless roller
Ruler
LED night light w/clear acrylic shade
sharp blade
glue- e6000 or scotch quick drying paper glue or Ultimate glue from Crafter's Pick


Step 1. Condition and roll out your clay on the thickest setting in your pasta machine.
Step 2. Make the sheet if clay 2 3/4" tall by 2" wide.

Step 3. Ink it, I am going to draw a basic Mountain scene for the project, please feel free to go nuts. Draw in the blue line for the sky. I am using Baja Blue Pinata.

Step 4. Blur the line with a cotton swab. I waited between pictures awhile, and the ink had dried partially


Step 5. Add more ink and blur. Fill the sky


Step 6. Using now, Lime green, I fill in the mountain.


Step 7. I used the Baja blue side of the cotton swab to blend the mountain and gave some variation to the green color of ink


Step 8. Once I make the sheets I let them dry. it only takes a hour or so to be completely dry or in my area right now about 10 minutes. The ink will also dry out the surface a bit and make the scratches easier and cleaner while carving.


Step 10. Start carving, the tip on mine bend down a little I like this. Cut in to the clay lightly with the wire and in one stroke with out turning the head  of the tool pull the tool towards you at the same level.


Step 11. Start carve in the outline of the mountain. It is harder to turn the head of the tool as you go so go slow and steady and not too deep. With practice you will be amazing. If you work on cardboard you can turn the cardboard while you are carving. The wire tip needs or works best when it parallel


The more detail you put in the better it looks. You  zentanglers are going to love this.


Step 12. Finish off the picture, it is a practice one anyway, Practice!


Step 13. You will have little bits of porcelain clay colored by inks so... to leave nothing to waste. Roll a ball of clay porcelain or another color in the little bits to clean them up and to use them up.


Step 14. Picked up.


Step 15. Roll in to the ball.


Step16. Flatten a little, make a hole in it, and cure in the oven at 275 degrees for 30 minutes.


Step 16. Bake your piece on the curve of the jar. I made this from one of my glass vitamin jars and I pressed the jar in to 1/2" logs of clay. They will stick so you can bake this piece with out gluing it.
Once the legs or logs on the bottom side of the jar are baked I glue with Scotch paper glue and let dry. That way I can re-bake this and use it over and over again.


Use the glues mentioned above to glue the Clay piece to the clear acrylic shade of the NightLight.
Do not block the Sensor with the clay sheet.

This night light is done with a mandala rubber stamp stamped right in to the porcelain colored clay.
The stamp is from Studio G, and distributed from Hampton Art Inc. Another great source of stamps for Polymer clay is Rubber Stamp Plantation in Honolulu Hawaii. Tell Deb, Marie sent you!
After stamping and carving while the clay is raw drop on colors of ink and spread, wipe off extra ink with clean up solution added paper towel. Do not scrub with paper towel, but wipe off gently!


As beautiful hanging out during the day!
 As it is lit up at night!

Have a great weekend, it is a holiday in the US, drive careful and be nice while you are out and about, you may give another being a reason to live another day by your miracle of kindness.

Tuesday, August 23, 2016

Translucents- Christmas Reef

I love this little piece.
It is Chihuly in polymer clay for me!
I admire the work of this man so much, the play on light through the glass and the clear colors that flow in his pieces.
Look here:
Something so peaceful and glorious about his stuff.
Made from Sunshine and Sand and human artist, very simple things combining for effect.
One of these things alone is not what the three are together, this is creation.
Christmas Reef
I am back playing with Translucent intensely for the 3rd time since I have started in polymer clay in 1978. I am loving every moment of it!
I am so glad I decided to walk this path again and I am loving where I am going. I am wondering why I ever put it down.
This is actually a teaching sample. It shows different applications of the exact same cane.
Have a great week and be the change you wish to see in the world.
Marie


Christmas Reef 2016 Copyright Marie Segal