Showing posts with label black and white canes. Show all posts

Wednesday, October 26, 2011

Dem bones, dem bones, dem fish bones! Part 1

Mrs. B is extending the giveaway for the bat and pumpkin cupcake necklace I made giveaway until the 1st of November so if you still want a chance you can hop on over there and add your name to the bunch.

http://www.confessionsofapagansoccermom.com/2011/10/giveaway-from-marie-segals-art-from-my.html
You can see the necklace in the picture below the cat picture.

Thank you for your votes on the Fave Crafts Blog Hop. I did not win, but I feel great about bringing a ton of new people and unique votes to their web page and I could not have done it with out all of you. Blessings all over all of you.


Spooky fish skeleton that is not just for Halloween.
At least that is what I think anyway.
I love this cane.
I hope you have fun making it too.


You will need:
Black Cernit
Opaque White Cernit
Porcelain Cernit
Biscuit Cernit
Clay slicing blade
Clay machine
Ruler if you wish

I mixed the black clay with Biscuit and the white clay with porcelain in equal parts
Condition and roll out the black in to a sheet on the thickest setting in your clay machine.


I cut five sheets in black 2 1/8" by 1 1/2".


Roll the white clay out on the 3rd thickest setting.
We will cut down the white sheets to size but these are a great size to start with.
Cut out 5 sheets of the opaque white 2 1/8" by 1 1/2".  You can use a black sheet as a template.


Cut off 1/8" from each side of the long side of the white sheet.


Lay a black sheet down and place this white sheet in the very middle of it.


Take another sheet of black the same size as the ones above and rolled out on the 3rd thickest setting like the white sheets above and cut off 1/8" from the long side.


Place the black strips on the side of the white sheet on both sides.


It will be like there is a whole sheet that is 2 1/8" by 1 1/2".


Add one of the 5 black sheets that you cut in the beginning to the stack above.


It will look like this from the side.


Cut off a little strip that is a bit bigger than the first ones ( 1/4") you cut. Do this from both sides of the sheet.


Place in the middle of the sheet of black that you just placed on the stack.


Cut off strips the same size as the ones you just cut off of the white sheet out of the black clay rolled out on the third thickest setting.


It will look like this.


Add another one of the first black sheets that were cut.


Cut off a strip on each side of one of the white sheets that you cut before, these strips will be a little bit bigger than the last strips.


Add the white sheet that is left to the stack in the middle.
Add strips of black clay rolled out on the 3rd thickest setting to the sides of the white sheet.
Then add another one of the first black sheets that you cut in the beginning.


Cut a bigger strip from each side of the next sheet of white.


Add the white sheet to the stack in the middle of the stack.
Add black strips to the sides of the  white sheet.
Add one of the original cut sheets of black to the stack.


You can guess what happens with the next white sheet right? I knew you could.
Cut strips on both sides of the white strip that are bigger than the last strips and add that to the stack.
Add black strips to each side of the white sheet.


Stand the cane stack on the end like you see it and cut through the center of all of the sheets.


Here is another view.


Add a sheet of white to the center of the cut on one side. The sheet will be rolled out on the 3rd thickest setting.

Put the stack back together with the white sheet in the middle...


Stay tuned for part 2.

Saturday, August 27, 2011

Atomic age Influence votive holder

While you are reading this I am escaping from home to go hang out with my friend Jodi and talk to an adult, craft until my fingers hurt, and stay up crazy hours. I am expecting to have a good time.
We are going to make some books ;-D
It is hot here, kind of cloudy and humid, I do not feel like doing anything. It is 99 degrees here and almost 4 pm on friday the 26th, crazy!
I will talk to you all on Monday have a great weekend.
Be safe and be well.


Make the canes from the Black and white tutorials.
Continued from Part 1:
http://mariesegal.blogspot.com/2011/08/black-and-white-canes-2-atomic-age.html
and Part 2:
http://mariesegal.blogspot.com/2011/08/black-and-white-canes-2-atomic-age_09.html
and Part 3:
http://mariesegal.blogspot.com/2011/08/black-and-white-canes-2-atomic-age_14.html

Save any pieces from the making of the canes that you have left over. We will use those.

You will need:

clay slicing blade
glass votive holder
Canes from tutorials


Start with the sputnik cane or I guess it could be a stylized dandelion, well whatever you want to call it.
Slice off the slices about 1/16" thick and place around the top of the glass.
Do not press on just place.
When you have them spaced evenly with about an 1/8" between all of them.
Press into place.


Here is a better view.


Add the second cane.
Place those below the others.
Press on firmly.


These are from the second cane and are left over.
Slice off some slices and round them a little with your fingers.


Place one of those between the big circles at the top of the rim of the votive holder.


Now I have added the pieces left over from the dandelion cane and placed those between the rectangle canes.


I added some of the spiral, basically I am building a net of canes around the top of the glass. I can have small open areas as long as all of the canes are connected together.
I rolled the spiral cane down to about 1/4" and added one to each of the bottoms of the rectangles.
Bake in a pre-heated 275 degree oven for 1/2 hour, shut off oven, and let cool in the oven.
Add a votive and you are good to go!


Sunday, August 14, 2011

Fave Crafts Blog Hop- Black and White Canes #2 Atomic age influence part 4, and Happy Monday!!

It is time again for the Fave Crafts Blog hop- finished on the 15th.

 You can click on the link/logo to take to you to a Fave Crafts page with all of the other artists participating in this.

Welcome to my site.
I am in the midst of a tutorial on Black and White canes with Cernit polymer clay.
A cane is a method of making images in rods of clay by layering different colors of clay together to form that image.
Then cross sections are cut of those rods and used in many applications like jewelry, and application to many different things like light switch plates, silver ware, glass, and ceramics just to name a few. The possibilities are endless.

It is an adapted technique from ceramic and glass, in ceramics it is called neriagi and in glass it is called millefiori.

You can see a wonderful example of neriagi here by Ito Sekisui V, make sure you scroll down to see the flowered vessel:
http://www.e-yakimono.net/html/ito-sekisui-v.html

Here is Wiki's definition with pictures of Millefiori in glass:
http://en.wikipedia.org/wiki/Millefiori


And now for the tutorial...

Continued from Part 1: http://mariesegal.blogspot.com/2011/08/black-and-white-canes-2-atomic-age.html

and Part 2:
http://mariesegal.blogspot.com/2011/08/black-and-white-canes-2-atomic-age_09.html
and Part 3:
http://mariesegal.blogspot.com/2011/08/black-and-white-canes-2-atomic-age_14.html

You will need:
2 blocks of Opaque White Cernit
1 block of Black Cernit
Porcelain White Cernit big block
Clay machine
Clay Slicing blade
ruler

Links lead to my husband's store http://www.clayfactory.net/.
Thank you for looking or buying, we appreciate it very much. It helps us eat and pay the bills.


Mix the small blocks of Opaque white with equal amounts of the porcelain white.
Then mix the black block with an equal amount of the porcelain white. It will look slightly lighter, but bakes up a beautiful black color.

1. Trim off the ends of your cane (so far).


2. Stand the cane on one end.


3. Add the round cane rods that you cut in part 3 to the block you have standing on end.
They go at the four points of the diamond image.
Trim off the excess from the four round rods.


4. Like so.


5. Roll a small coil of white clay about 3/16" and using your thumb and forefinger press in to a triangle shape.


6. You will need 8 of these as long as your image block is high to go around the small rods in white wrapped in black.


7. Tuck one of the points of the triangle in to the space under the coil, just enough to fill that space, not enough to move it.


8. Press them in like this. I have this turned on its side so I can show you how it is done. You do not want to lay this on the round cane and press it in, it has to be standing so you do not flatten the round rods.


9. Fill all of those spaces on the image block.


10. Roll a coil of white clay that is about 3/4" in diameter and a little bit longer than the length of the image block. Trim off one end so it has a flat edge.


11. Cut the coil in half through the length.


12. Add one half flat side in, to the top right side of the image and add the other one to the bottom left hand side of the image flat side against the image.


13. Roll another coil that is the length of the image block's height.


14. Now cut that one in half through the length. Add those to the other diagonal spaces. The top left and the right bottom of the image block.


15. Roll out a coil of white that is about 3/8" in diameter. Press it into a triangle shape.


16. Add those triangles to the left and right side of the image right in the middle of the two half coil on each side.


17. Roll out another small coil of white about 3/16" and press into a triangle.
This you will use to fill in the two spaces on the top and the bottom of the image block where there is a dip on the top and one the bottom.
You will need four of these triangle pieces.


18. Here the image block is filled in all the spaces with one left to trim off. It is basically in a rectangle shape.


19. Pinch the block in the top corners and in the bottom corners to make them more defined and more like a rectangle. Pinch them all the way down the image block side in all 4 corners.


20. Roll out a sheet of white on the thickest setting in the clay machine. Trim off the leading edge for the straight edge. Lay the rectangle image block on that edge.
Trim off the right and the left side of the block to make the sheet that width.
Wrap the sheet around the rectangle image black sides.


21. Wrap it up and trim the other end of the sheet to match the beginning of the sheet. Smooth the seam with your finger.


22. Press on the side of the image block to compress together and reduce. Go slow and use the flat part of your palm (or the flattest part) usually the heel of your palm. That heel of your palm is the strongest too. Press down as evenly as you can.
Turn the block 1/4 turn to another side and press again the same way.
You have now done all four sides.
Flip the cane(image block) from end to end and proceed to do all 4 sides again. then repeat, doing this over and over until you have reduced the cane down to about half the size.


23. When I have reduced the cane down far enough I then I hold the cane with one hand and use my upper palm and slide my hand down the cane to lengthen it.
Always turning it one-quarter turn now and again and then I flip it from end to end and do the same thing from the other side of the cane. This makes it smooth and stretches it out. I am gliding the top of my palm over the clay.


24. When you have reduced it down to about 1" by 3/4" cut it in half.
Tah dah!
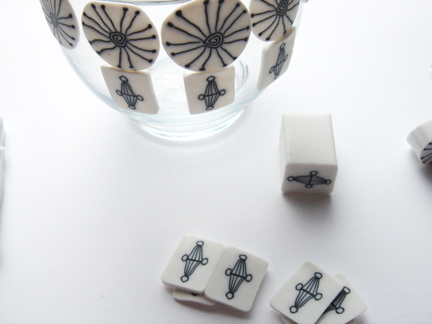
Come back for the next one we are going to cover a votive in all the black and white canes we have made so far.