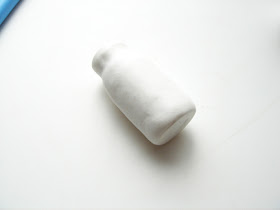
This is the how to cover the Bottle of hope and make the lid. It is continued from part 3 here,
http://mariesegal.blogspot.com/2011/06/flower-cane-and-bottle-of-hope-part-3.html
You will need:
Violet Cernit- 1, 2.2 ounce packages
Opaque White Cernit- 3, 2.2 ounce packages
Black Cernit-1, 2.2 ounce packages
Yellow Cernit- 1. 2.2 ounce package
Blue Cernit- 1, 2.2 ounce package
Porcelain White Cernit- large package 1.1 pound
Clay Machine
Clay Slicing Blade
Acrylic roller
Ruler
All links lead to my hubby's store http://www.clayfactory.net/
Thank you so much for looking, we appreciate that. ;-D
Mix all of the colors, even the black and opaque white with an equal amount of porcelain white.
69. Roll out a sheet of the Opaque white cernit on the 4th or 5th thickest (this depends on what you like, the clay you are using, and how thick or thin your 4th or 5th setting is) setting in your clay machine.
Lay the bottle on top of the sheet and trim the leading edge so it is straight.
Trim the bottom edge to the bottom of the bottle.
70. Roll the bottle over the other side of the sheet, making a mark with the leading edge and trim just inside the line you made with the leading edge.
Just like covering the canes we have done in the other lessons.
71. First you want to press in around the neck and ease the clay around the indent. This is different on every bottle and some may take more time and care than others. Try not to trap any air in there.
72. Hold the blade level with the top of the bottle and trim off the excess bringing the blade around the top of the bottle. The blade will lay right on top of the bottle.
73. Trim along the bottom the same way.
74. Using a cutter that is slightly smaller than the bottom of the bottle roll out a sheet of clay that is on the 4th or the 5th setting of the clay machine, cut out a round of clay.
75. Press the round on to the bottom and press down in the very center,
Go to one edge and work your way around the bottom of the bottle closing the edge.
76. You can then press the edges together. Do this all the way around.
77. I then like to roll the edge on my work surface.
78. I roll the bottle on my work surface to smooth the fingerprints out or off.
79. Take a 7/8" ball of the opaque white Cernit and roll it till it is smooth on the surface.
80. Roll in to a teardrop. Roll into a teardrop by rolling on one side of the ball.
81. It will look like this. The thinner end should fit inside of the bottle opening.
82. Place in the opening of the bottle. Shape the lid.
Keep from pushing it on to the lip of the bottle.
83. Gently take it out of the bottle by turning gently and pulling it out.
Cut off the end at about 1/2" or more so the stopper is not too long on the bottom.
84. Place the stopper back in the bottle to reshape and decorate the bottle.
I sliced off a large slice from the flower cane and then rolled down a small section (2") of the cane to about 1/4" and sliced off small flowers about 1/8" thick and place them around the neck of the bottle.
85. I added the flower with out a border to the top all the way around the larger slice and then added some of the plain petals to the bottom placing the points of the petals in to the dips between the 1/4" round flowers.
I rolled down some of the plain shaded blue cane and added those slices between the petals.
86. Gently pull the top back out of the bottle twisting as you go.
Bake the top out of the bottle on a piece of corrugated cardboard in a 275 degree preheated oven for 30 minutes, shut off oven and let cool a bit. Pull out of the oven and place the stopper back in the bottle while still warm and let cool completely.
The stopper will stay in the bottle and will pop in and out when you remove it or put it back in!
I like the tops made this way because we never lose the top then. When we do lots and lots of bottle and the tops fall out all of the time, sometimes it is hard to find the matches and sometimes we lose them when transporting them too!
This way they are always in the bottle.
I stained this bottle with some brown Ne-Opaque and washed off the excess with a damp not sopping old towel. I then blushed on some hi-lite blue Lumiere to the slices of the canes.


I love your bottle of hope! Maybe i'm gonna try make them one of these days :-) You make easy tutorials,thats for sure!
ReplyDeletexoxoxo Donna
This is so pretty!!!
ReplyDeleteI love your Bottle of Hope Marie, the finishing touches with the stain and Lumiere created such a neat look. I've been wanting to make some Bottles of Hope for quite a while now... You've inspired me! Thanks! :)
ReplyDelete~Trina
Very beautiful!
ReplyDeleteWow. Love your tutorial and such a Beautiful Finished Product! Hugs,Tee
ReplyDeleteI love the texture and color of the white clay...it looks like a mushroom.
ReplyDelete