Pages

Tuesday, May 31, 2011

Monday Updates on Tuesday!

I have been missing in action pretty much for the last week. I tried to post things that I thought interesting, but there was no person behind the post most of the time. Love that scheduling the posts thing.
I had two classes over the weekend.

Last week it was down to the wire and I forget how much time it takes to raise a child, I forget that I am older and do not have quite the unlimited fountain of youth at my back to stay up all hours of the night and keep going for days on end, while taking care of my grand-daughter, cooking food, doing dishes and laundry, I did skip the cleaning though ;-D, feeding the animals, meetings, emails, writing, editing, and planning, and all of the other things that is takes to make sure every one is happy in my classes and happy at home!
Well, I did do most everything I needed to do while going to bed at a decent hour, taking care of family, the blog, taking care of Madi, and everything else my life has become.
All of them are important to me so there was no ignoring them.
Being self-employed is wonderful and I only have to work half day, any twelve hours will do!
A couple of things were not completed or forgotten, but all in all I had a wonderful time at my classes with wonderful people.
The pictures that I have, show them either in deep concentration or laughing and that I figure is a pretty good sign.
I am thanking out loud Kelly and Howard for being an awesome support team and helping when I needed it most.
Thank you so much to all of the people who travelled to take my class. I really enjoyed myself and it is a pleasure to have gotten to know you all a little better.

To my Blog Buddies, Thank you for your comments while I was away and I missed you all.
I hope to get around to some of the blogs this week. Hope you all had a great Memorial day here in the U.S.
Have a great week this week. Blessings all over you all.

I am listing  the Rodrigo Borgia Switch plate now.


I am also putting up a new listing of some vintage chain in the Hoarders Closet, this is a small delicate chain that comes in gold and silver and is in 25 meter spools. I have never had this one up there before. This chain will work well with 24 gauge non-tarnish silver and non-tarnish gold artistic wire, the wire will fit in to the little loops too!


Friday, May 27, 2011

Women in Art


by Philip Scott Johnson

500 Years of Female Portraits in Western Art

Music: Bach's Sarabande from Suite for Solo Cello No. 1 in G Major, BWV 1007 performed by Yo-Yo Ma


Happy Friday everyone!

Thursday, May 26, 2011

Another new plaque-Kelly's Birthday

Ok, I say I love all of these and I do, but this one is one of my very favorite's.
Happy Birthday Kelly!
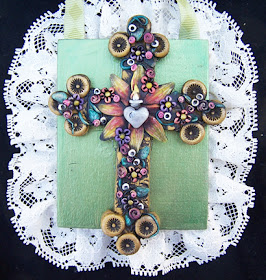
I have wanted to construct a cross that I like without using a cutter.

This is what I got.

I like it!
Thank you for the pictures Kelly.

Wednesday, May 25, 2011

Wednesday Wonder- Woodwife Wednesday

It is a wonder to me how many giving and talented people there are out there in Blogland.
How can it get any better than that?
I know all of them!!! ;-D
My friend the Woodwife is a multi faceted, talented woman.

I love this tutorial, here, http://mariesegal.blogspot.com/2010/05/to-antique-or-not-to-antique-part-5.html simple, effective, and quick, 
and the Woodwife, Donna, took some of my pieces and included them in one of her works of spirit.
I love being able to be a piece of this love charged piece.

And this is what she did with them.


Cool huh?


Nice touch. Everyone can use a guardian angel.

I adore the colors on these.

Great Job Donna!!! Donna has a couple of Etsy stores too.
The Woodwife Wares http://www.etsy.com/shop/thewoodwife
Blue Otter Arts http://www.etsy.com/shop/blueotterarts

Tuesday, May 24, 2011

A Sacred Heart for Ellie

Happy Late Birthday, Ellie!
She likes Purple. Can you tell?
Ellie took the picture for me too!

Monday, May 23, 2011

Something happened Friday :-O

I know it seems the same on the outside here, but something happened Friday that rocked my world.

Cynthia Tinapple from Polymer Clay Daily mentioned my little switch plate and my series tutorial on the African Trade beads, she also mentioned a bit of our history in polymer clay.  You can see it here http://polymerclaydaily.com/2011/05/20/polymer-family-history/

"On this blog I showcase the best polymer clay art online to inspire and encourage you."
 from the Polymer clay Daily Blog
This is a big deal in the Polymer Clay World (Oprah big) and I am humbled by the response and by the large number of comments and out pouring of thanks and cheers!
You are so welcome!

I just have to say that I could have never done this with out the help and support of my dear hubby Howard who just wanted to be a stay at home dad.
He did that!! Well done Howard and along the way he also gave me the encouragement and push that an artist sometimes needs.

Thank you Cynthia, so much, I can not even begin to word how I feel and how much this means to me.
Blessings all over you!
And thank you Howard, you are the best!
What a long strange trip it has been. ;-D

Happy Monday to you all, welcome to new friends, and be kind to each other and change the world, one smile at a time.

Sunday, May 22, 2011

African Trade beads-part 12 Shinning Star part c

This is the 3rd installment of the shinning star cane.
You can find part a here
http://mariesegal.blogspot.com/2011/05/african-trade-beads-part-12-shinning.html

You can find part b here
http://mariesegal.blogspot.com/2011/05/african-trade-beads-part-12-shinning_18.html


You will need:


Clay Machine
Clay slicing blade-SB
Red Cernit
Yellow Cernit
Blue Cernit
Opaque White Cernit
Green Cernit
Porcelain White Cernit
Ruler if you need it
Middle cutter in the Makin's clay Star set M36006
Knitting needle 3 to 4mm

All links above lead to my husband's on-line store the www.clayfactory.net
Thank you so much for looking.


This is the picture and the instructions from the last part b http://mariesegal.blogspot.com/2011/05/african-trade-beads-part-12-shinning_18.html


Trim off the excess, if there is any.


Take the conditioned blue clay and roll it out in your clay machine on the thickest setting.
Trim the leading edge of the sheet for a straight edge. Lie the cane on top of that edge.
Trim the side to match the size of the cane length.


Roll up the cane in the sheet and then roll the leading edge over on top of the sheet on the other side of the cane and gently make a mark on that sheet.
Cut with the clay slicing blade just inside of the mark that you have made. Roll the cane up in that sheet. the edges should meet up.
You do not have to smooth and mess with the seam more than pressing the edges together.


Roll out some of the conditioned yellow and fold the sheet in half to double the thickness.


Do the same thing with some of the conditioned red clay.


Cut the yellow sheet to the width of the cane center and then use the yellow sheet to measure the red one.


I added more of the porcelain to the green here. I used the same mixed that I used in this cane here
http://mariesegal.blogspot.com/2011/04/african-trade-beads-part-11.html

Double the green clay as you did with the red and the yellow and then cut to the same size as the yellow and red sheets.


Trim the end to the other sheets.


Trim the sides to match those edges.


The piece that you see trimmed off is the folds of all the sheets. I did this so I have a straight edge.

I then made my first cut which is about 3/16" in thickness.
Cut down and drag the blade forward with the clay piece against the blade and on it.


Use the slice to measure the width of the next slice and then drag the blade forward again and stick the next slice to it. Measure and cut again. Do this for about four slices or more if you can
;-O
It is not required though, you can add one section at a time. ;-D


Lay the slices in the repeating pattern against the cane center. Wrap around cane.


If this is what you end up with match the bottom edges of the slices together and then...


Turn the cane on its side and press the two matching slices in to place.


Press a little waist in to the cane by squeezing with the your thumb and forefinger and then turn a little and squeezing again.


Turn the cane and press moving upward in a circle a little press at a time.
See the center of the end of the cane moving out, this is right.


You can squeeze like this too, turning and squeezing to the end of the cane.


Turn the cane over and start in the middle again and work your way out to the other end of the cane.


When you have reduced it this way to half of the diameter it was, roll on the surface of the table of work surface.
If the cane looks rough on the outside like this you have probably done a good job and the inside will be nice and straight.
When you roll the cane you will start in the center of the coil and roll with both hands all the way to the tip of your fingers and then all of the way back past the palm of your hand in one smooth move while moving your hands away from each other.
Remember to move slowly and to make sure the cane rotates over 180 degrees when you roll. Do not make short movements it will not make a smooth coil, it will put in little dents from your fingers. The movement is smooth and fluid.

Roll down to about 3/4" and roll the blade and the cane forward at the same time to cut in the center.
You can refer back to the other canes in this series to see how that is and the description that comes with them.

Tah Dah!!! Stars.

Thursday, May 19, 2011

If the Borgia's had light switch plates part 2

Thank you so much for the wonderful comments on the last switch plate. You all made my day.
It was very nice to have people love something that I love too!
This is not always the case.
Have you ever made something and thought this is the best thing I have done, EVER?
Then had no one take the least bit of interest or even the slightest look at a piece you think is just the best thing you have ever done.
*I don't mean here though, I am very lucky here to have all of your kind comments. But I used to work all week to take things to shows to sell at for a good many years, and the ones I thought were just awesome and would sell like hot cakes usually didn't ;-D*
Don't you just hate that?
I know hate is a strong word, but I really don't like that a lot.
So thank you again for agreeing with me. I love that switch plate, but...
this one is my all time favorite now!

Don't know why, just is. I do think it is the color though. It is a little brighter and lighter than the last one.

Maybe because the individual components stand out more against the background.


Rodrigo Borgia was pope at the end of the 15th century, he was a womanizer and he used his papal seat to elevate his family to new heights of wealth and prestige.
There are also opinions of the opposite too.
Pope Alexander VI
"His pontificate is frequently characterized in extremities – he is often said to have been the worst of all Popes. But there are also positive opinions and legends about Rodrigo, mostly strengthened by the recent discovery of various historical documents. The era in which Alexander VI held supreme papal power was full of scandals, infringements and signs of moral offense among the highest authorities of the Latin Church, and whether he did any worse than many of his predecessors and successors has been questioned."


Papa ALEXANDER Sextus

He served from 11 August 1492– 18 August 1503
11 years and 7 days
But 17 out of 22 cardinals supposedly voted for him out of greed.

It is a new Showtime series called
the Borgia's and Jeremy Irons plays Rodrigo.
I am intrigued by the costuming and the sets and Jeremy Irons. ;-D
It is very hard to beat
Jonathan Rhys Meyers as Henry in the Tudors in my opinion.
I am finding though that the more I know the characters, the more I like, no love, the series.
The season finale airs on Sunday the 22nd of May. ;-(

Wednesday, May 18, 2011

African Trade beads-part 12 Shinning Star part b

This is continued from Part one here:
http://mariesegal.blogspot.com/2011/05/african-trade-beads-part-12-shinning.html

You will need:

Clay Machine
clay slicing blade-SB
Red Cernit
Yellow Cernit
Blue Cernit
Opaque White Cernit
Green Cernit
Porcelain White Cernit
Ruler if you need it
Middle cutter in the Makin's clay Star set M36006
Knitting needle 3 to 4mm


All links above lead to my husband's on-line store the http://www.clayfactory.net/  
Thank you so much for looking.

Mix all of the colors and the opaque white with equal amount of the porcelain white.


Last picture from the last part

I go back and cradling the star in my palm I pinch the points on the star again to sharpen them up.


Roll out a sheet of the conditioned red that is long about 5"x at least 2 1/2" wide.
Trim for straight edges on three sides.


Roll out a coil that is about 3/8" in diameter and the width of the sheet.
Lay the coil along the bottom edge of the sheet.


Roll up the sheet and the coil together to form a large coil of clay.


Trim off the rough edge and roll the whole thing up.


Roll the cane down until at least half or more fit in one of the dips between the points of the star. Measure it to the height of the stacked stars and cut one. I trim off one end of the red log so it will stand straight next to the star stack.


Cut two more of those coils.


Press with your finger and thumb of one hand down and out on the coil and then using the clay slicing blade cut the coil in half.
Do that with the other two coils too!


Like this.


Make the coil into a triangle piece by pressing with your thumb and forefinger on top of the coil half, press straight down with your finger and thumb pressed together.


It will look like this. Do that with the other pieces, you will only need 5 total.


Place the point of the coil into the dip between the point of the stars. Place one in each dip.
Stand the star up so you do not smash the points of the star.
Trim off the excess length from the top of the triangle half coils.
Place all of the coils before worrying about how they fit yet!


Place the last one in and trim off the excess from the top.


Note* I cradle this in my other hand while press the two edges of the half triangle coils together.
I do a little at a time on all of them and then turn the cane from end to end and so it again all the way around.
I am only showing it on the work surface because I take the pictures by myself.
Press your thumb towards your forefinger.


Here is what the star stack will look like after you have packed it.
Don't worry if it doesn't look perfect from the end. There is some distortion by pressing the clay and the ends will look funny but may not be funny inside.


Condition and roll out a sheet of the opaque white. Trim the side to the star stack and the edge before the star stack.
Now trim the other side to match the star stack.


Roll the cane up in the sheet of white and roll the leading cut edge over the sheet on the opposite end to make a mark. You do not have to press hard just enough to make a mark with the cut edge.


With your clay slicing blade cut just inside the mark you made with the opposite edge  of clay.


Roll the cane up in the sheet and the edges should meet very nicely.


Trim off the excess, if there is any.


Stay tuned for part 3...