Pages

Tuesday, November 30, 2010

Marie-tangle beads part 3 spacers

This is continued from part 2
This tutorial will be for the little black spacer beads in this photo.
you can make these of any color. They are pretty much mindless work, so you can do lots in front of the TV.
I like to have something like that for in the evenings when I am not sitting at my desk and working. Idle hands and all that!
This is definitely the zen part of the whole thing.
Chop wood, carry water kind of work.

You will need:
Cernit Black
Clay machine
5/16" Round Kemper cutter
Knitting needle


Condition and roll out black clay on the thickest setting in the clay machine.
Fold the sheet of clay in half for double the thickness.
Press them together.
Using the 5/16" round cutter cut out rounds.


When you have a bunch cut out, roll the cut outs in to balls.


When you have a bunch of balls, pinch flat. Try to use the same pressure and pinch flat evenly.
They should not be much bigger than the end diameter of the Marie-tangle tube bead.


When you have a bunch of flat pieces, use the knitting needle point to press into the middle of each flat bead.


You can then pick it up and press it in a little further. Just a little, so you can see the end of the needle.


You then take the bead off the needle and put the point through the hole you just made on the opposite side or in the out hole.
This will keep the holes nice.


Do this with the rest of the flats and bake on a piece of card stock or card board, grunge board or chip board.
I use a piece of a box top from a cardboard box we get product in, like I used for the ultra fancy back ground in my necklace shot above and below!!
I love baking on cardboard in my baking trays.

These also make very good beads for children to make.

You can also use different sizes of  round cutters for different size beads.
By using a single sheet of clay you get bead sizes in between.
Gotta love that!! Keeps everything the same size, yet hand rolled and made.


Monday, November 29, 2010

Monday updates

Hi all, missed posting this morning, sorry. Busy weekend.

Wrote the rest of the Marie-tangle tutorial and posted that- one more part to come on how to make the little spacer beads.
I am thinking about adding little sparkle beads to that. They might be nice with those tangle tube beads  too. It will probably go up in the next couple of days. Taking pictures for that.

Loaded a lot of things in to my shop Art from my Heart at Etsy. Took tons of photographs and edited a lot of them.

Got another cold or got so cold I got the previous cold back, too cold here. 28 degrees last night, white everywhere this morning. No snow, just frozen grass, roofs, and cars. It is beautiful in its own special way.
Maybe I can get a picture. I must have the camera ready and get up before the sun does though.
As soon as the sun comes out it goes away. It is so cold though I would rather stay in bed.
It has been like this for a few days. We are all freezing. I know it sounds like whining and it is, but we have a little space heater and no forced air heating, don't really need it most of the time. LOL! Couldn't afford to use it if we had it anyway. Insulation would be nice too. Don't need that in old houses in southern California either, right?
Madi and I are sitting on the couch as I write this, bundled up in 3 blankets, eating breakfast, and watching Curious George. Oh... that is the reason I love the cold and not having very much heat in this house, Love it!!
Or I need feet jammies like Madi's.

I have been playing with paper and I have a very talented and giving woman and website to share with you.
It is Laura and her blog The Paper Trail. What a wonderful place to spend a bunch of hours and learn something too. She has an etsy store if you like kits and instructions "Following the Paper" on Esty. She also has an Ustream and you can watch her put things together.
On Friday and Saturday she has live broadcasts and chats. My friend Jodi got me hooked on Laura and we made some of the Birdhouses for gifts for family on the weekend I told you about the marathon crafting. I am so happy with how they turned out and I am now absolutely addicted.  Jodi is very good at this. I have already made some angel feet out of granite Cernit for another house to sit on. I love them.
I am now making envelope scrapbooks you can see the You tube here.
Thank you Laura for all you do!

Being a holiday weekend, I had lots of time to work, it was so nice.
It is hard to do most of this stuff with a very smart and busy little girl. I have to do as much as I can on the weekends.
Have a great week everyone!!
Be creative and do not forget to smile at a stranger. You just never know whose life you might make better.
Hope you all had a great weekend.
If you live in the US, I hope you had a wonderful holiday weekend.
Stay warm, especially in your heart.

Sunday, November 28, 2010

Marie-tangle beads part 2

This introduction is from part 1 continue below for the rest of the instructions.


I like these, they remind me of Zentangles, but I thought I would call them Marie-tangles, because they are not drawn on, but stamped.

Also, I am anything but Zen most of the time, especially when I am writing the tutorials. When I am creating new stuff, I am all over the place, trying a million things at once.

This is a very old technique for me, using black ink and off white clay, but now, including a stamp that probably was a Zentangle before there were Zentagles, is how these came about.
From part 1

You will need:

Cernit in Caramel, black, and Opaque white
Pearl-ex stamp pad- black (Jacquard has discontinued these stamp pads ;-( I am using Clearsnap/Color Box Ancient page and they are perfect for this. More intense color and they dry on the surface of the clay too, you need that to make the beads and handle them before baking)
Stamps- Jumbo Miro Background
hand 150-002K
Fantasy Flower 2 - lg 260-001L
The stamp I am using is a very old molding mat from Color Box. It looks just like a busy doodle! The other stamps will work as well.
Or you can find your own stamps, with lots lines for this.
Clay Machine
Clay Slicing blade-SB
knitting needle pointed on both ends
5/16" round kemper cutter


Ink up the stamp with the stamp pad. I stamp the pad on to the stamp several times to build up the ink and make sure I have covered all of the lines.


Here is the pad all inked up. I have a small thin piece of packing foam under the stamp here. You can also use a folded old towel if can not find this sheet foam.
This way when you roll the clay tube rod over the stamp, the stamp is flexible and will stamp and mark the whole tube.


Place the rod or knitting needle with the clay on it on top of the edge of the stamp.
If you are using something smaller than these molding mats, then you only want to work with smaller sections of clay tube.
Roll the tube forward by holding the ends of the knitting needle.
You only have to roll forward an inch or inch and a quarter to cover the whole bead.
Do not pick up the bead to check and try to get it back on the stamp in the right place. This is one time deal.
If you screw it up, mash up all the clay and start over again.
It will color the clay, but you can use it for scrap or bead cores.


Here it is covered.


You can see how the ink is pulled of the stamp better here.


Here you can see the slight over stamped area.


I use this ink because it dries on the surface of raw clay. When the ink is dry I take the bead gently off  the knitting needle, cut them to the size I want. I cut the long one about 2 1/2" long and bend it gently in to a curve.
The others are 3/4" sections and 1/4" sections. The straight beads can be cut after they are baked while the clay is still warm with the clay slicing blade.

Stay tuned for part 3

Thursday, November 25, 2010

Marie-tangle beads

I like these, they remind me of Zentangles, but I thought I would call them Marie-tangles, because they are not drawn on, but stamped.

Also, I am anything but Zen most of the time, especially when I am writing the tutorials. When I am creating new stuff, I am all over the place, trying a million things at once.

This is a very old technique for me, using black ink and off white clay, but now, including a stamp that probably was a Zentangle before there were Zentagles, is how these came about.

You will need:
Cernit in Caramel, black, and Opaque white
Pearl-ex stamp pad- black (Jacquard has discontinued these stamp pads ;-( I am using Clearsnap/Color Box Ancient page and they are perfect for this. More intense color and they dry on the surface of the clay too, you need that to make the beads and handle them before baking)
Stamps- Jumbo Miro Background
hand 150-002K
Fantasy Flower 2 - lg 260-001L
The stamp I am using is a very old molding mat from Color Box. It looks just like a busy doodle! The other stamps will work as well.
Or you can find your own stamps, with lots lines for this.
Clay Machine
Clay Slicing blade-SB
knitting needle pointed on both ends
5/16" round kemper cutter

Mix 1/6 of a block of caramel with one whole block of opaque white until it is one color.
Roll out the clay in the clay machine.
Double for thickness and press together the two sheets.

Cut the one end closest to you at an angle that leans in towards the surface,
Leave about a 1" on the surface of the doubled sheet and cut down leaning out at the bottom.


Trim off each of the ends of the strip of clay.


Notice the trapezoid shape of the sheet.
Top edges are angled towards each other and the bottom edges are angled away from each other.
Press the edges together around the rod or knitting needle.
Match the seams together.


Pinch the edges together and smooth out the seam with your fingers.
I also knock the clay loose from the metal rod by twisting the clay the opposite way from the rod.
I do not grab with just my fingers, but I use my palm clenched gently around the clay to do this.
The clay will break loose from the metal and then you can roll the rod and clay on the table to smooth and elongate the rod of clay.


Stay tuned for part 2...

Thankfulness

Today in the US is a holiday called Thanksgiving. The 4th Thursday of the month of November.
It has been traditionally a harvest holiday and it is celebrated in several places.
In Canada it is celebrated on the 2nd Monday in October.
Although we Americans claim the holiday, there are historical references to the holiday being celebrated earlier in Canada.
It is also celebrated in a Gothic church in Leiden in the Netherlands on the morning of the day commemorated in America.  It is to acknowledge the hospitality the pilgrims received in Leiden on their way to the New World.
Grenada also has a holiday that is also known as Thanksgiving day that is celebrated on the 25th day of October.
Liberia also celebrates a Thanksgiving on the first Thursday in November.

I suggest we take this day to realize the things we are thankful for. I also think that we should take this day and bring a little of it in to each and everyday of our lives, 365 days a year.

If you have a roof over your head, be thankful.
If you have family you love, be thankful.
If you have any food to eat, be thankful.
If you have friends to love and cherish, be thankful.
If you have love in your heart, be thankful.
If you have family and friends that love you, be thankful.
If you are alive today, be thankful.

There are many stories of this Holiday and how it was celebrated, that are easy to find all over the web and in our schools.
There are also other stories that can be found that may be the true ones, no one really knows, because none of us were there.
I did enjoy reading this side of the story too.
I have a friend that told me one time that History is always written by the victors.

So, I am thankful for all of you! Thank you for reading this page in my world.
May you have food to eat, family and friends to love and that love you, may you have a place to sleep and rest your head, and may you be healthy and strong.
Blessings all over all of you!!
Gobble till you wobble and if there is no turkey, eat chicken!

Tuesday, November 23, 2010

Angel maker!

Shelley's Phoenix BOH
Sorry about yesterday and not posting in the morning. I went to my friend Jodi's over the weekend after clay day and on Saturday I made things from 10am to 2 am the next day. I got up on Sunday and did it from 9am to 9 pm.
I was exhausted Sunday when I got home and just couldn't bring my self to do another thing after a massive making weekend. I adored it, every moment of it.

Clay day we had so much fun and made Bottles of Hope for Moore's Cancer center at UCSD again.
We made over 80 bottles for the center.
I have pictures too!
Everyone there, thank you so much for working and playing so hard, ya all did so good!!
Jodi and I Paper play
Then I left there and went to my friend Jodi's to craft some more.
I was doing some paper arts with her and making a couple of things, I will have more on these two things later.

Right now I want to introduce you to an artist I admire and respect so much, Susan Hyde.
Susan has just opened a Etsy store.
In my opinion Susan makes some of the most artful and heartfelt angels I have ever seen.
Go visit her and heart her. Her clay "fabrics" that she dresses her angels in are not painted and her techniques in polymer fabric making are beyond compare.
We all know how hard it is to get started on something new in life and it is always nice to have a hand up.
Welcome her to Etsy and see some beautiful angels made by a beautiful woman and friend!
I have had the complete pleasure of working with Susan and I have several of Susan's pieces and the work and detail is meticulous.
Welcome to Etsy, Susan, may you make many contacts and sales.

Looks like this is turning out to be an angel kind of week. I think I will follow, I could use some angels.

If you would like to participate in the 17th giveaway, there is a picture and a link on the right top side bar.
Comment and you could win an angel.

Monday, November 22, 2010

Michelle and Stellan need angels

Prayers are needed for Michelle’s beloved Stellan.


You can visit Michelle HERE.
I ask, because I met so many of my dearest friends through our beloved Rene, so I know you to be prayer warriors.
Michelle and Stellan are in need of a miracle.
(I took this from Midlife poet's blog, because why say it again when it is so perfectly put the first time, thanks Deb. I sure hope you do not mind)
Seems like a perfect angel week.
This a real love story, it needs our help!

Saturday, November 20, 2010

The 17th giveaway-Victorian Angels and My birthday

Next week is my birthday and I wanted to spice things up for myself, so I am having an angel giveaway.
It is also the gratitude month and I am grateful that you read my blog, come here and comment, and sign up to follow, thank you from the bottom of my heart!!


angel1

I was making some of these angels for an order and I made 3 before I realized I had forgotten the bee.
If you don't mind that the bee is missing, then these are for you!


angel 1a

The angels wanted to fly away I guess.


angel 1b
 It is also coming up to Christmas and maybe this might be the right thing for someone you know.
Maybe it will help you out with some of your shopping and save you a little money!


angel 2

If I get enough people I will give away all 3.

First 50 comments- one angel
100 comments- two angels
and if by chance I get 150 comments I will give away all 3 angels.


angel 2a

I am also going to use the rules I used last time because I enjoyed them so much, it is after all my birthday.


angel 2b
 Rules


1. Leave a word or "words of wisdom" for one entry. That is a comment on my blog.

To get more entries, leave a comment for each one of these next rules.
 
2. Go to my Shop "Art from my Heart" in Etsy and leave a comment on this post only, with the piece you like best there.


3. Be a follower, already or become one, and leave a comment on this post only saying so.


4. Post about my giveaway in your blog and leave a comment on this post only, with the link.


5. Place the angel in your side bar on your blog with a link and leave a comment on this post only.


6. Tell me about an angel in your life and leave a comment on this post only.


7. Tell me why you have to win this contest. It won't help you win, it will be the luck of the draw (or random number generator) but I am curious to know why!

angel 3

 
Remember you have to leave a comment for each rule if you want the extra entries. If you leave all of the answers on one comment you will only get one entry!


angel 3a
  
This contest will close on December 4th at 6 pm pst.


angel 3b
  
I will be out and about all weekend, so if your comments don't post right away, don't freak. I will post them as soon as I get back. I have comment moderation on!!
Have a wonderful weekend my pretties and, say, do, or be something nice to someone!
The world needs and wants your light!

Thursday, November 18, 2010

Butterflies are free

My hubby carries Ink Jet printable fabrics in his on-line store the Clay Factory (not just a clay store) and I have been dabbling.
He carries Silk, Cotton, and Organza.

I did some encaustic work with the silk and the silk disappears in the wax and the image is left.
Tres cool!
If you use the cotton the image is stronger and more defined. So if you put the cotton in the background and the silk floating in the wax over the top you will see the cotton behind.
I think this encaustic thing needs some more play time devoted to it.

I print on the cotton and have been stitching some of them on to felt. Please do not critique my stitch work, it definitely is not my forte. Practice does make proficient sometimes, so I will keep working on that.
I used Dover images for the butterflies and the black and white images in the background. I just wanted to test it out before I got too carried away with anything.

I am planning on making some sachets and some ornaments with this type of work. I am excited and it is something I can do in the evening.
I have some cute pictures of Madi that I want to make ornaments with.
I also want to make some sachets with my art work. I will keep you posted on my progress.

I just love how the cotton looks. I can imagine making face patches out of these for clothes. You can use a fusible webbing and then iron the patches on  and then do a decorative stitch around them.


It would be great if I knew how to quilt too. LOL!! I need another hobby!
I do though see something coming from the butterflies.
Fun stuff! 

Wednesday, November 17, 2010

Wednesday Wonder- water, water everywhere

...and in southern california, not a drop to spare.


I thought, this will be a good one, there will be nothing there. Wrong again!

Water is even used in advertising.


The Chinese even have water Graffiti. Whoa!


I couldn't have said it better than that.

Here is a great product where you can paint with water.
It might just make a great Christmas present
Buddha Board.
Have a magical Wednesday.


Martin Waugh combines art and science to capture nature's infinite beauty.
Throughout history, water has calmed the soul, soothed the spirit and healed the wounded. Martin's free-flowing photography evokes images from rolling, rhythmic oceans to drops of water falling upon a lake, taking one on a spiritual journey bounded only by imagination.

Tuesday, November 16, 2010

Ivory Angels

Here are some new angels I have been working on. I hope to have them up in the etsy store soon.


They have a Victorian feel to me and I adore them.
My mom would love these.

Monday, November 15, 2010

Fave Crafts Blog hop today- November

I am a little late today sorry. Tired, a sore throat, and a "just slept in" kind of day.
Welcome to my place here if you are coming from Fave Crafts. I hope you enjoy your visit.

I was out all weekend at craft fairs, I had a great time, it was fun being out and about.

It is Fave Craft's monthly blog hop today the 15th of November and I am going to let you have it, LOL!!
I don't have much for this month because I've been working for those fairs but I am sure there will be plenty of other's over at the hop that have tons to share.
Hop on over and have a great time.
Tah dah!!!
Now presenting "Finished on the 15th"
Click button and go!

My contribution for this month is "Oh wooden it be lovely" a polymer clay tutorial on handmade wood.
A 3 part series.

Part 1

Part 2

Part 3

Have a great week you all and I love you, my pretties.

Visit my etsy store if you have a chance, I will will be loading it up with some awesome goodies this week.
Art From My Heart at  Etsy

Sunday, November 14, 2010

Stamping Details

I am at Stamping Details in Poway for a Craft Faire if you are in the area.
http://www.stampingdetails.com/

Saturday, November 13, 2010

Getting small- in fine nettles

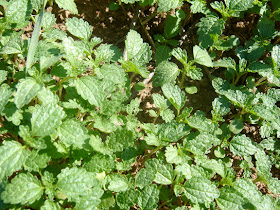
We had dirt hauled on to the property once and now we have nettles forever.
It has been raining this year a little more that usual, and all of these beautiful green seedlings started sprouting all over the yard.
There are a few pieces  of grass, very few but mostly this is...

Nettles!!!
Oh No! even these tiny little beauties will sting if you walk bare foot on them. They are so beautiful though.

Like this cushion-y layer of soft plants that you could lie in and soak up the sun.


I waited for them to get larger because we have another volunteer plant that grows here that doesn't sting. I thought they might be nettles, but I wanted to wait to be sure.


Yep, there are the infamous hairs of pain.
Nettle is the common name for between 30-45 species of flowering plants of the genus Urtica in the family Urticaceae, with a cosmopolitan though mainly temperate distribution.
Thank you Wiki!

Closer...

Be careful now, this stuff bites.


The Latin name Urtica means "burning" and "uro" means " I burn".  The sting of nettles contains the chemicals Histamine, which irritates the skin, Acetylcholine that causes a burning sensation and Serotonin, which causes the other two chemicals to react. This is the main side effect from using nettles. The leaf of the Dock Rumex is traditionally used to reduce the pain of the nettle sting and are normally found growing in the vicinity of nettles.


There is lots of Folklore about nettles. In Norse mythology Thor the god of thunder is often represented by nettles and burning them on the fire will protect you from his lightening during thunderstorms. Also in Norse mythology Loki, the trickster god, spun fishing nets out of nettles. Actually a very good string can be made out of nettles and nettle string had many uses in the ancient world.                                                        From the School of Natural Health Sciences  Check this web page out...very interesting.


Nettles contain vitamin A, vitamin B1 (thiamine), B2 (riboflavin), B3 (niacin), B5 (panothenic acid), vitamin C, vitamin D, vitamin K, vitamin E. chlorophyll, potassium, calcium, mangaan, acetycholine, serotonine, sulphur, iron, selenium, magnesium, chromium and zinc.


Culinary uses: Care has to be taken in collecting nettles to avoid it's irritating sting and the wearing of stout gloves is highly recommended. However, the leaves are high in nutrients and also very tasty, making it worth the trouble, whilst cooking them destroys the stinging effect and makes them perfectly safe to eat.
From Vortex Health where they sell nettles in capsules. Seems like the best idea to me!
Photo credit here goes to Wikimedia commons and the ever wonderful
Jerome
Prohaska
OH, oh, oh, now I know why those things hurt so bad.

"out of this nettle, danger, we grasp this flower, safety." -Shakespeare


You can also read another getting small post here.